
Software Instruction Manual
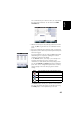

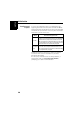
Table Of Contents
- Table of Contents
- Introduction to ProMark Field
- Installing ProMark Field
- Getting Started With ProMark Field
- Creating a New Job
- Importing/Exporting Jobs
- Running a Post-Processed Project
- Using Your Rover in a Real-Time RTK Project
- Changing the Storage Medium for Raw Data Collection
- Initialization
- Logging with Offsets
- Setting an RTK Base
- Installing Geoids
- Adding Background Maps
- E-Compass & External Device
- Index
English
53
See table below.
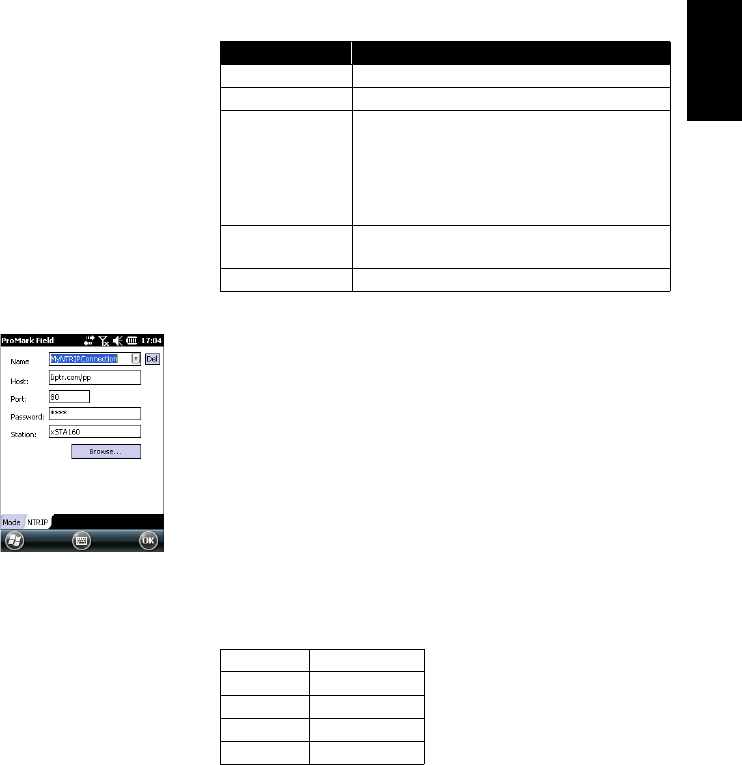
NOTE: You can create as many NTRIP and Direct IP
configurations as necessary. Each configuration can be
recalled by just selecting its name (Name field). A recalled
configuration may be deleted by tapping on the Del
button.
• Tap on the Format tab and choose the format of the
corrections the base will generate and deliver (Eight
possible choices: RTCM3.0, RTCM2.3 (DGPS), RTCM2.3
(RTK), CMR, CMR+, ATOM, ATOM compact or ATmOM
super compact).
• Tap on the Station tab: Enter the Station ID for the base.
This number is left to the user’s choice but the following
ranges of Station ID values are recommended depending on
the selected data format:
• Recording tab: Although operated as an RTK base, the
receiver can also collect raw data. In that case, enable the
Record raw data for post-processing function, check that you
are using the desired storage medium (it is a good practice
to use a Storage Card) and choose the recording interval
(default: 1 second).
Device Settings
UHF radio Type, baud rate, advanced
GSM (CSD) modem None
Network connection
via GSM (GPRS)
modem
Direct IP parameters:
• Name, host, port
Or NTRIP parameters:
• Name, host, port
• Password, station
External cell phone
via Bluetooth
See Handheld Platform for ProMark Getting Started
Guide, Advanced Features section.
Other external device Port, baud rate
Format Station ID
RTCM 3.0 0-4095
RTCM2.3 0-1023
CMR, CMR+ 0-31
ATOM 0-4095