
User Manual


55
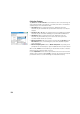
Collecting Offset Points
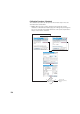
• Tap Offset on the Data Collection screen.
• Enter the offset point name and description.
• Tap Azimuth/Bearing to indicate that you will be measuring either the
azimuth or bearing angle from the occupy point to the offset point. Then
tap Zenith/Vertical Dist to indicate that you will be measuring either the
zenith angle and slope distance or the vertical and horizontal distances
from the occupy point to the offset point
You can take these measurements using a compass and a tape, or a laser
range finder. The laser interface is shown in the lower-right corner: Enter
the instrument height before taking a shot.
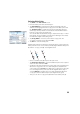
• Tap Occupy GNSS to collect the position of the occupy point. The
acceptance criteria are those defined for Data.
• Tap Store to collect the offset point.
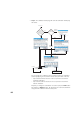
Another method exists to measure the direction from the occupy point to the
offset point which is to collect another point (3) aligned with the offset point
(1) and the “occupy” point (2). See diagrams below:
– Choose a suitable point (3) and place the pole over it.
– Tap Direction from two Points to collect this additional point. The acceptance
criteria are those defined for Data.
– You will then be asked to define the location of this point compared to the
offset and occupy points. This is to allow Survey Pro to determine the
correct angle: Choose In Front if the offset point is located at one end of the
line connecting the three points (see the two diagrams above, left), or
choose In Between if the offset point is located somewhere between the
occupy point and the additional point (see diagram above, right).
– Then you can collect occupy point (2) and then store offset point (1).
1
2
3
1
2
3
1
2
3