KIRK telecom A/S Langmarksvej 34 DK-8700 Horsens Tel. +45 7560 2850 Fax +45 7560 2851 kirk@kirktelecom.com w w w.kirktelecom.com 141435-HD . ED1, R&T 75 50 26 66 User s Guide KIRK 4020 and KIRK 4040 2.
Congratulations on your new KIRK handset Your new handset from KIRK telecom will provide you with the greatest possible degree of flexibility and mobility due to high battery capacity, low weight, practical size and design. Contents: 1. 2. 3. 4. 5. 6. Construction ...........................................................................4 Battery installation ..................................................................5 Charging ......................................................................
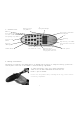
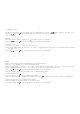
4 1. Construction Headset Connector (only KIRK 4040) Display with backlight MENU key Left arrow key, Redial Menu from standby text Key for internal calls (not used on KIRK Wireless Server) Loud speaking (only KIRK 4040) LED Alarm key Keyboard LOCK (Menu*) Right arrow key, save number. Phone book Menu from standby text Recall key (MAIL key) SILENT (Menu#) ON/OFF HOOK keyalso used as turn O N key CONFIRMATION key MUTE microphone. MUTE ringer when ringing. Long key press turns OFF.
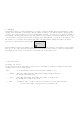
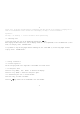
6 3. Charging During normal operation, it takes approximately 3 1/2 hours to charge the handset from fully discharged to itsfull capacity. Place the handset in the charger. When the handset is turned on, the display shows the charging status in line 3. For correct charging be sure the room temperature is between 0 C and 25 C. Do not place the handset in direct sunlight. The battery has a built-in heat sensor which will stop charging if the battery temperature is too high.
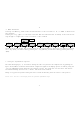
8 INT - If residential systems: Internal calls off hook (not used on KIRK Wireless Server) Turns loudspeaking on and off (only KIRK 4040) R -Ifoff hook: Recall.
10 6. Making a call For making or receiving calls the handset has to be subscribed to a system ( shown in display) (see Chap. 7.5.1). Press the -key, the -icon in the display will flash until connection is established. Dial the number. Pre-dial: Press the number to dial (long press on will make a pause, if necessary). Press the -key, the -icon will flash until the connection is established. * Telephone book: Press the > -key (BOOK) to enter the telephone book.
12 Please note: If the Date and Time function is supported, then date and time of the incoming or outgoing call is shown in the CLIP/Redial stack on the 4th line of the display. See Chap. 8 for more information. Speed dial: See Chap. 7.12 and Chap. 10 for more information about speed dialing. 6.1. Receiving calls If the phone rings, the call can be answered by pressing the -key. When ringing the LED flashes fast, and the display shows the CLIP (if presented).
14 7. Menu structure Pressing the MENU-key, enters or exits the menu structure. It has to be used if a NO or CLEAR is wanted in the menu structure. Pressing the 3-key, jumps to a lower level in the menu. When the lowest menu level is reached, it will store the setting and jump to a higher level. It has to be used if a YES is wanted. KIRK telecom MENU LOGIN MENU M S F FUNCTION PROFILE SET-UP MENU MENU EXT.
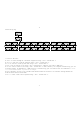
16 7.2 The key functions Key 1 2 3 4 5 6 7 8 9 0 * # Capital letter ?!1-+*/=&()%¿¡ AB C 2 ˜ ¯ ` ˆ ˘ ˙ DEF3¨ ˚¸ GHI4 ˝˛ˇ JKL5 M N O 6 PQRS7 TU V 8 W X Y Z9 [Space] , . 0 : ; _ A a #@E$£ ¥§< >{|} [\] Small letter ?!1-+*/=&()%¿¡ abc2 ƪ def3ŁØŒº ghi4 jkl5 mno6æ ıł pqrs7 tuv8 øœß wxyz9 [Space] , . 0 : ; _ A a #@E$£ ¥§< >{|} [\] 7.3 Profile set-up To set-up the handset press ME N U.You are now able to switch between the different settings. Press 3 when you find the setting you wish to change (or see).
18 Profile set-up (fig) KIRK telecom PROFILE SET U P SET PROFILE BACKLIGHT SET PROFILE A D VA N C E D SET PROFILE RINGER TO N E SET PROFILE RINGER VOL SET PROFILE KEY CLICK SET PROFILE VIBRATO R SET PROFILE B-ANSWER SET PROFILE STA RT V O L U M E SET PROFILE O U T OF RANGE SET PROFILE AUTO KEYLOCK SET PROFILE LANGUAGE BACKLIGHT ON/OFF A D VA N C E D RINGER TO N E 1,2.........
20 O U T O F R A N G E:The out of range indication can be turned on/off using < and >. Confirm with 3. With the out of range indicator turned on, a beep will appear when the telephone is moving out of range of the base station, and OUT OF RANGE will appear in the display. A U TO K E Y L O C K:The auto keylock function can be turned on/off using < and >. Confirm with 3. With auto keylock turned on the handset will automatically lock the keys after 30 seconds. Press MENU to activate the keys again.
22 7.5.1 Create subscription To make subscriptions, the system must allow subscriptions to be made. Some systems also require an Access Code (AC). If more than one system currently permits subscription, you will need to know the ID of the system to which you wish to subscribe. Access Codes and system ID s will be provided by the system administrator. Choose the SUBSCRIPTION CREATE function to subscribe to a new system (see Chap. 7.5/7.5.4).
24 7.5.3 Auto login The handset can be subscribed to 10 different systems. If a handset is subscribed to two or more systems, you can use Auto Login A to change between the systems automatically.The selected system is marked with an A . Please note: Auto login A should only be used in separate systems without overlaps.
26 7.5.4 Remove subscription Subscriptions can be removed from the system in use and from the 9 other systems (if connected). Removing a subscription requires a password. Password is factory set at 0000. If the system in use is removed, it is necessary either to select one of the remaining systems or to subscribe to a new one. If one of the systems not chosen is removed, the handset remains connected to the system in use. 7.5.5 Change startup text The startup text is predefined as e.g.
28 7.7 Redial The handset has maximum 10 redial numbers and 10 Caller ID s placed in the same stack. Each number is only represented once. Enter the Redial Menu by pressing the < -key (REDIAL) from the standby text. Repeated presses at the < -key turn backward through the dialled numbers and CLIP numbers (from newest to the oldest). The > -key moves in the opposite direction. It is also possible to reach the Redial Menu in the main menu. Numbers are named REDIAL , CLIP or with the name.
30 7.8 Book Storing a number (max. 24 digits) in the telephone book is done by pressing the number to be stored (in on hook), then press the > -key followed by the 3-key.The book can store up to 200 numbers with name. Typing of the name and a confirmation is required. After storing the telephone will go back to standby mode. If the display shows KIRK telecom M E M O RY FULL , it is necessary to delete one or more numbers from the telephone book.
32 7.9 External services External services are features placed in the main system, and only available if the handset is subscribed to a KIRK solution. Under External services can be found; View Clip Stack , Delete Clip Stack and Local Phone Book . The Local Phone Book is a common phone book for all handsets subscribed to the actual system, and all handsets subscribed to the system are listed in the phone book. Additional numbers can be added to the phone book by the system administrator. 7.
34 7.11 Mail/Text Messages Available in systems configured with the possibility of sending text messages At the reception of a text message the envelope icon appears in the display.The envelope icon is indicating one or more unread messages. The text message is shown in the display, and when the message is read the envelope icon will disappear. If the message contains a call-back number, this will be displayed on the bottom line of the display.
36 Delete a mail Open the mail by pressing the R-key followed by the 3-key, press the 3-key again and use the < > -keys to find the delete feature, press the 3-key and the mail is deleted. Lock/unlock a mail Open the mail by pressing the R-key followed by the 3-key, press the 3-key again and use the < > -keys to find the lock/unlock feature, press the 3-key and the mail is locked/unlocked. W rite a mail To write a new mail press the R- key (MAIL), confirm with the 3-key and write your message.
38 7.12 Speed dial Please note: To use the speed dial function it is necessary to set LONG KEY to SPEED DIAL (see Chap 10). The speed dial list has maximum 11 speed dial numbers. Calling a number from the speed dial list is done by pressing the 0,1,2...9 key with a long key press or by pressing the alarm button key. If no number is assigned to the key it is possible to enter a new number.The number is added to the speed dial list automatically. To store a number (max.
40 9. Language There are 10 predefined languages in the handset: English, German, French, Italian, Spanish, Dutch, Portuguese, Swedish, Danish and Norwegian. Select the required language by pressing the 3-key. If an 11th language is present this will be shown. This language is a specific dealer language and is factory programmed.
42 A. K E Y D E L AY:Used to define the time for how long the alarm key should be pressed before the alarm key function is executed. LS O N B -A N S W E R:Can be turned on/off using < and >. Confirm with 3. When turned on the loudspeaker turns on automatically when answering a call. When turned on and B-ANSWER ON (hands-free) is selected, the handset also turns on the loudspeaker automatically (see Chap. 7.4). (Loudspeaker only works on KIRK 4040). S TA N D B Y TEXT:Can be turned on/off using < and >.
44 11. Shortcuts * KEY LOCKED : Press: MENU . (Display shows ) SILENT : Press: MENU #.
46 12.2 Error information Improper function of the handset might be related to the installation of the KIRK solution or failures related to the main system. Before declaring a handset for repair be sure that the main system is operating properly. 12.3 Warranty The handset is covered by a normal warranty-solution, except the battery.The lifetime of the battery depends on the general use of the handset.
48 12.5 Important safety instructions and product information Before using your telephone equipment, you should always follow basic safety instruction to reduce the risk of fire, electrical shock and injury to persons, and damage to property. 1 Read and understand all instructions 2 Follow all warnings and instructions including those marked on the product 3 Unplug this product before cleaning. Do not use liquid cleaners or aerosol cleaners.
50 those controls that are covered by the operation instructions. Improper adjustment of other controls may result in damage and will often require extensive work by qualified service personnel to restore the product to normal operation. D Q If the product has been dropped or cabinet has been damaged E Q If the product exhibits a distinct change in performance 11 Avoid using telephone during an electrical storm.
52 Power failure In the event of a power failure or flat battery, you cannot use the handset to make or receive calls Battery Precautions To reduce the risk of fire, injury or electrical shock, or property damage, and to properly dispose of batteries, please read and understand the following instruction. THIS PRODUCT C O N TAINS NIMH BATTERIES. BATTERIES MUST BE RECYCLED OR DISPOSED OF PROPERLY. DO NOT DISPOSE OF IN MUNICIPAL W ASTE. 1 Only use type KIRK 8474 3411 in the handset.
54 NOTICES NOTICE: Before installing this equipment, users should ensure that it is permissible to be connected to the facilities of the local telecommunications company.The equipment must also be installed using an acceptable method of connection. The customer should be aware that compliance with the above conditions may not prevent degradation of service in some situations. Repairs to certified equipment should be coordinated by a representative designated by the supplier.
56 Part 15 of the FCC Rules. These limits are designed to provide reasonable protection against harmful interference in a residential installation. This equipment generates, uses and can radiate radio frequency energy and, if not installed and used in accordance with the instructions, may cause harmful interference to radio communications. However, there is no guarantee that interference will not occur in a particular installation.
58 If the product is repaired, reconditioned component parts or materials may be used. If the product is replaced, we may replace it with a new or reconditioned product of the same or similar design. The repaired product will be warranted for either (a) 90 days or (b) the remainder of the original one (1) year warranty period, whichever is longer.
60 The product must not be disposed of with unsorted waste, but must be collected sparetely.