Welcome to the Thickset family! This guide will get you up and running with your new Halo Touch Fingerprint Smart Lock. If you have any issues, please visit our support center: or call us at 1-B00-327-5625.
Getting started For an interactive version of this installation guide, please download the Thickset app: P Lines FB Act Ye
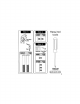
n Remove your existing deadbolt If drilling & new door, Use the supplied template and Instructions available at: % | kwiksetiom/doorprep
Install the latch Extend the [arch bolt. A your door requires drive-in ate, biggest contact Thickset at (2X) \Ft fie D-shaped hole is ot cantered in the door hale, rotate the toh face to extend App the latch, & “Use the longer screws if the Hales + G are worn out, You will have two [OUTSIDE] extra stows.
Install the strike sore 0&5 : “Install the longer screws closest to. the door Jami.
{INSIDE] Tighten the screws evenly: PQ NOT over-tighten. Iterate the cable though the center hale, than push into’ Iris the key Bid test the ach, Ethic ‘adjust the resows.
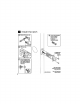
Install the interior assembly Make sure thi turbulence shaft i§ pointing up 25 show below, Remove the interior cover from tha interior assembly. Fiche portulaca shaft Is Rat painting Ub, put tie cover Back oh and rotate the tuppence.
Secure the interior assembly onto the mounting plate: [INSIDE] Connect the cable, Ensure a tight cable connection. Lay cable fiat inside tie bottom of the interior housing. Ensure the spindle fully engages with the turn piece shaft.
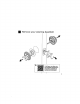
Perform the door handing process install 4 AA batteries into the With the door open, battery pack, install the b. pack to auto-handing: The latch wit retract and extend to learn the orientation of the door. ‘Then the status LED will indicate success of failure. Status LED GREEN: Successful. Proceed to the next step. RED: Unsuccessful. Make sure the rock interior and batteries are correctly installed. Proforma step 5 again.
[INSIDE] Secure the interior cover onto the interior assembly, You may need to rotate the turn piece to align with the turn piece shaft. For additional security, you may choose to lock the window by installing the security screw. When the window is hocked, you will need to remove the entire waver to access the battery pack and buttons.
Create your account Follow the setup instructions in the Thickset app to create your account: 34] pe fiat LF pen Kd 0] pny nt) 2 Dread on the Get Ton & App Store be Google Play A hg kwiksst app is needed to use this lock, If this lack was professionally installed (or installed by someone other than the homeowner), make sure this step is performed by the homeowner.
Locking To lock your door, place any finger on the fingerprint sensor, The light bar will display the following animations, beep once, and the door will lock. Unlocking To unlock your door, place your enrolled finger on the fingerprint sensor. The light bar will display the following animations, beep once, and the door will unlock. BIE Orange sweep, Alleles moving toward orange for door alga 2 secants Alleles Green sweep. Annulled blistering moving away green for authentication from door edge.
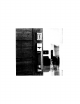
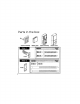
Halo Touch at a Glance Exterior interior {cover removed) Light bar ley Battery pack — Button "A" Button ron sensor button SroartiKey™ @ ) Status LED LL] tool access Turbulence | @ shaft eh ¥ [PEED NN ouch lev rT Ve
Important Safeguards 1. Read afl instructions in their entirety. 5 2. Familiarize yourself with sll warring and caution statements. ; 5. 3. Remind al family members of safety precautions. notifications. 5. Always have access ta your lcs * Standard key. 5 if using the Auto-Lock pastures, make sure you have your smartphone of standard key with you to prevent locking yourself out. .
Tabla de Contenido Piezas en la Caja os 4 Herramientas necesarias INSPECCIONA ini snr 7 Descargue la aplicación 17 Quia de referencia 19
Hl Retire su cerrojo existente, $i perfora una puerta nueva, use la plantilla suministrada vy las instrucciones disponibles en:
BB instale el pestillo Extienda el pasillo. Sif orificio en forma de D no estad centrado en al orificio da la puerta, gibe la cara del pestillo para extenderlo, [AFUERA] A\ isu puerta requiere un pestillo de inserción, comuníquese con Lisera ol 1-800-327-5625. @x “Use tornillos més faros si los agujeros están desgastados. Cendras dos tomillos adicionales.
Instale la placa smo 7] 4X Fg “insta los tornillos mas {argos del lado de Ja Jamba de [a puerta.
[ADENTRO] Apriete fos tornillos de manera uniforme. NO pariste demasiado, inserte fa lave y pruebe el pestillo. Si ef pestillo no se extiende © retrae suavemente, ajuste fos tornillos. 4 Pase ef cable a través del orificio central, Juego empújelo hacia ef orificio inferior.
segrego de que el cia de la pieza giratoria este apuntar ido hacia arriba como se muestra a continuidad.
Asegure el ensamblaje interior en la placa de montaje. [ADENTRO} Aseglares de que la conexión sea firme, (D) Acomoda ef exceso de cable en el fondo del alojamiento interior. Asegúrese da que el gje se enganche completamente con of eje de la pieza giratoria.
Realice el proceso de orientación de la puerta Instale 4 AA baterías eri el Con la puerta abierta, conjunto. instale ef conjunto de baterías para Iniciar 1a orientación automática. £1 pestillo se retraer y sa extended para aprender la orientación de la puerta, £1 LED de estado indicar éxito o falla. Co SO > VERDE: Éxitos. Continuar con el siguiente paso, ROJO; Halls, Giraseis de que ef Interior de la cerradura y fas bacterias antes instaures correctamente. Realice ef paso 5 nuevamente.
Asegure la cubierta [ADENTRO] interior en el ensamble intérprete. Es posible que deba girar la pieza giratoria para afine aria con ef eje de la pieza giratoria.
Bloqueando Desbloqueando Para cerrar la puerta, coligue Para desbloquear la puerta, cualquier dedo an ef densar de coligue ef dedo registrado en el huellas digitales. La barra de sensor de huellas digitales. La barra duces mostrar las siguientes de luces mostrara las siguientes animaciones, emitir un pitido y la animaciones, emitirá un pitido v Ia puerta se bloqueara. puerta se desbraguetados.