
Installation Guide
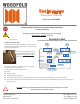


E dge Location Marks
#6x1½ at head screw
Mounting Panel
#6x1½” Flat Head
3
Install140-120906
This next section is the most critical. Improperly installing the Mounting Panel results in the majority of trouble
calls to Woodfold.
Repeat after me: I will read this section. I will read this section.
3. Mounting Panel
If your door is a LH or RH stacked door or a pair (see Page 2) you need to read this Section.
If Your door is DE, forget the warning above and skip ahead to Section 4.
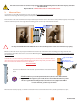
Push the door to the side that will be fastened permanently to the wall. Let the door form its own plumb (hang free) and carefully
mark the wall with a pencil at the edge of the mounting panel near the top and bottom of the door.
Mark wall near top and
bottom at edge of
Mounting Panel
It is important! Make the marks while the door is in its stacked position or the door will not close properly.
Check it out! Can you see the pencil marks? If not, the door has shifted. If there
is a gap between the edge and your marks, the door has shifted the other way. Stack
the door against the Mounting Panel; it should form a neat, tight stack. DON’T
Force it. If it binds, you missed your marks!
Caution! Take care when attaching the Mounting Panel to the wall. As you unfold the door to
insert the screws, the position of the Mounting Panel may move away from your marks. Some-
times, the marks look “o” when the door is extended.
Trust your marks!
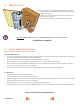
OK! Here comes the critical step. You just marked the wall at the top and bottom of the mounting panel edge with the door
stacked. Now, extend the door to have access to the Mounting Panel. Hold the Mounting Panel edge at the pencil marks at both
top and bottom!
Insert #6 x 1½” at head screws about 8” up from the oor and 8” down from the
track.
When the door stacks properly, re-extend it and install 2 more screws between the rst 2, about equal distances apart.