
User's Manual
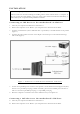

Table Of Contents

INSTALLATION
Connecting an IDE Device to the motherboard’s SATA Port:
1. Turn off your computer and all devices connected to it.
2.
Remove the computer’s cover. Refer to your computer user’s manual for more details.
3. Connects your IDE device (such as IDE hard drive or optical drive) to the IDE interface of the product
(Figure 1).
4. Connects the Yellow SATA connector on the adapter to the SATA port on the motherboard using a
SATA cable (Figure 1)
Before installing this product, let us make the following assumptions:
End users must have the basic knowledge of installing a device and its software driver to a computer. If
they are not sure about their abilities or have any queries, please call their local dealers immediately, or
find somebody who is experienced and qualified for assistance.
Figure 1:
IDE Device to motherboard’s SATA Port connection
5. Connect the 4-pin FDD power connector of the product to the motherboard Power Supply Unit (PSU).
If there is no 4-pin FDD power plug available on the PSU, please use the included power extension Y-
cable to convert the 4-pin HDD power plug to a 4-pin FDD power plug.
6. Place the computer’s cover back to the chassis and then turn your computer on.
Connecting a SATA device to the motherboard’s IDE Port:
1. Turn off your computer and all devices connected to it.
2. Remove the computer’s cover. Refer to your computer user’s manual for more details.