Installation Instructions for Frontload Washers Original Instructions Keep These Instructions for Future Reference. (If this machine changes ownership, this manual must accompany machine.) www.alliancelaundry.com Part No.
Table of Contents Washer Dimensions................................................................................ 4 Installation............................................................................................. 5 Before You Start............................................................................................. 5 Tools..........................................................................................................5 Parts Included...............................................
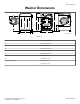
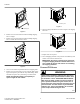
Washer Dimensions Washer Dimensions A D B C E J H I F G FLW2331N_SVG Figure 1 A 611 mm [24.06 in.] B 1027 mm [40.42 in.] C 813 mm [32 in.] D 1006 mm [39.61 in.] E 371 mm [14.6 in.] F 683 mm [26.875 in.] G 52 mm [2.04 in.] H 704 mm [27.73 in.] I (with door closed) 40 mm [1.59 in.] J 333 mm [13.1 in.] © Copyright, Alliance Laundry Systems LLC - DO NOT COPY or TRANSMIT 4 Part No.
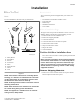
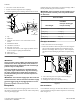
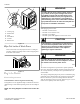
Installation Installation Before You Start Parts Included Tools An accessories bag has been shipped inside your washer. It includes: For most installations, the basic tools you will need are: 1 • • • • • 2 4 3 Two fill hoses with washers and filter screens Four rubber feet Beaded strap Installation Instructions User’s Guide Order of Installation Steps 5 " 16 9/ The proper order of steps must be followed to ensure correct installation. Refer to the list below when installing your unit. 1.
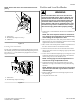
Installation FLW2297N_SVG1 Figure 5 FLW2378N_SVG 6. Insert two plugs included in accessories bag into rear shipping bolt holes. Figure 3 2. Remove two 9/16 inch bolts and washers holding shipping brace to weight. 3. Remove two 9/16 inch bolts and washers holding shipping brace to washer base and remove brace. FLW2358N_SVG Figure 6 7. Replace front access panel. 8. Save all shipping materials. They must be reinstalled any time washer is moved more than four feet.
Installation Water Supply Requirements Water supply taps must fit standard 19 mm [3/4 inch] female garden hose couplings. DO NOT USE SLIP-ON OR CLAMP-ON CONNECTIONS. NOTE: Water supply taps should be readily accessible to permit turning them off when washer is not being used. Recommended cold water temperature is 10° to 24° Celsius [50° to 75° Fahrenheit]. Recommended maximum hot water temperature is 51° Celsius [125° Fahrenheit]. Warm water is a mixture of hot and cold water.
Installation 6. Turn water on and check for leaks. 7. If leaks are found, retighten the hose couplings. 8. Continue tightening and rechecking until no leaks are found. Install the drain hose into the drain receptacle (standpipe, wall or laundry tub) following the instructions below. IMPORTANT: Drain receptacle must be capable of handling a minimum of 32 mm [1-1/4 inch] outside diameter drain hose.
Installation NOTE: End of drain hose must not be below 610 mm [24 in.]. Position and Level the Washer WARNING 1 Washers elevated above floor level must be anchored to that elevated surface, base or platform. The material used to elevate the washer should also be anchored to the floor to ensure that the washer will not walk or that the washer can not be physically pulled, tipped or slid from its installed position.
Installation 3 1 WARNING 2 To reduce the risk of fire, electric shock, serious injury or death, all wiring and earth/ground connections MUST conform with the latest edition of the AS/NZS 2040.2:2005 and such local regulations as might apply. It is the customer’s responsibility to have the wiring, fuses and circuit breakers installed by a qualified electrician to make sure adequate electrical power is available to the washer. W895 6 5 When plugging in the washer: 4 1. 2. 3. 4. 5. 6.
Installation cian or your local electrical utility company check it and correct any problems. Standard 240 Volt, 50 Hertz, 3 Wire Effective Earth/ Ground Circuit WARNING 3 3 This unit is equipped with a three-prong (earth/ ground) plug for your protection against shock hazard and should be plugged directly into a protective earth/ ground three-prong receptacle. Do not cut or remove the earth/ground prong from this plug.
Installer Checklist Installer Checklist Fast Track for Installing the Washer 1 Position Washer Near Installation Area. 5 Position and Level the Washer. NOTE: Tighten locknut after final adjustment. NOTE: Place rubber feet on all four leveling legs. CHECK 2 FLW2312N_SVG1 CHECK Remove the Shipping Materials and Install Plugs. 6 CHECK Wipe Out Inside of Washer. CHECK FLW2316N_SVG FLW2359N_SVG 3 Connect Fill Hoses. NOTE: Screw black colored or hex nut shaped hose couplings onto the water taps.