Installation Instructions for Topload Washers Original Instructions Keep These Instructions for Future Reference. (If this machine changes ownership, this manual must accompany machine.) www.alliancelaundry.com Part No.
Table of Contents Washer Dimensions and Specifications................................................... 4 Installation............................................................................................. 5 Before You Start.............................................................................................5 Supplies..................................................................................................... 5 Order of Installation Steps..............................................
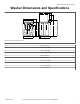
Washer Dimensions and Specifications Washer Dimensions and Specifications A B C D H G I J F E TLW2075N_SVG *With leveling legs turned into base. A 28 in. [711 mm] B 22.13 in. [562 mm] C *53 in. [1346 mm] D *40.25 in. [1022 mm] E 26 in. [660 mm] F 0.4 in. [10 mm] G 25.63 in. [651 mm] H *29 in. [737 mm] I *43 in. [1092 mm] J *36 in. [914 mm] Part No.
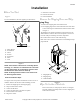
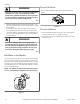
Installation Installation Before You Start 7. Add water to the washer. 8. Check the lid switch. 9. Check installation. Supplies For most installations, the basic supplies you will need are: 2 1 3 4 5 6 Remove the Shipping Brace and Shipping Plug 1. Remove the shipping brace from under the lid. 2. The shipping plug will be released from the base of the washer when removing the cardboard base from the washer. Refer to Figure 2 .
Installation NOTE: Water pressure under 20 pounds per square inch [138 kPa] will cause an extended fill time in the washer. Turn on the water supply faucets and flush the lines for approximately two minutes to remove any foreign materials that could clog the screens in the water mixing valve. This is especially important when installing your washer in a newly constructed or renovated building. Build-up may have occurred during construction.
Installation 4 COLD HOT 1 3 4. Tighten strap to hold hose to standpipe. This will prevent the drain hose from dislodging from drain receptacle during use. 1 2 2 8 6 5 7 6 5 TLW1988N_SVG 1. 2. 3. 4. 5. 6. Filter Screen (Screen must be facing outward) Fill Hose Rubber Washer (Plain) Cold Water Connection Hot Water Connection Install this end of hose to valve connections at rear of washer. 7. Install this end of hose to water supply faucet. 8. Faucet 3 4 TLW1981N_SVG 1. 2. 3. 4. 5. 6.
Installation 1 1 2 TLW1977N_SVG W329I_SVG 1. Wood Block 1. Beaded Strap (tape if necessary) 2. Standpipe Adapter Figure 9 Figure 7 4. Place rubber cups (from accessories bag) on all four leveling legs. Laundry Tub Installation 1 For this type of installation, the drain hose MUST be secured to the stationary tub to prevent hose from disloding during use. Refer to Figure 8 . Use the beaded strap (supplied in accessories bag) to secure hose.
Installation Do not slide washer across floor once the leveling legs have been extended, as legs and base could become damaged. 9. Verify that unit does not rock. Standard 120 Volt, 60 Hertz 3-Wire Effective Earth/ Ground Circuit Plug In the Washer 2 3 1 Electrical Requirements 8 120 Volt, 60 Hertz with 3-Prong Earth/Ground Plug NOTE: The wiring diagram is located in the control hood.
Installation Check Lid Switch WARNING Improper connection of the equipment earth/ground conductor can result in a risk of electric shock. Check with a qualified electrician or service person if you are in doubt as to whether the washer is properly connected to a protective earth/ground. Washer should stop filling, agitating, and spinning when lid is opened. W822 • DO NOT modify the plug provided with the washer – if it will not fit the outlet, have a proper outlet installed by a qualified electrician.
Installer Checklist Installer Checklist Fast Track for Installing the Washer 1 Remove the Shipping Brace and Shipping Plug. 5 CHECK Position and Level the Washer. CHECK 1 3 2 TLW2201N_SVG TLW1975N_SVG 2 Wipe Out Inside of Washtub. 6 CHECK Plug In the Washer. CHECK TLW2009N_SVG D254I_SVG 3 Connect Fill Hoses. 7 COLD Add Water to the Washer. HOT CHECK CHECK TLW1988N_SVG W391I_SVG 4 Connect Drain Hose to Drain Receptacle. 8 CHECK Check Lid Switch.