
Owner Manual

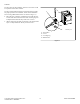
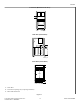
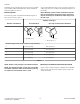
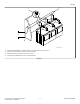
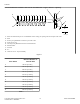
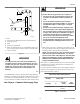
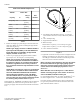
Table Of Contents
- Table of Contents
- Safety Information
- Dimensions
- Installation
- Operation
- Maintenance
- Troubleshooting
- Contact Information
- Installer Checklist

Installation
Before You Start
Tools
For most installations, the basic tools you will need are:
DRY2586N_SVG
8
7
6
5
4
3
2
1
1. Wrench
2. 1/4 inch Driver
3. Screwdrivers
4. Level
5. Gloves
6. Teflon Tape
7. Duct Tape
8. Safety Glasses
Figure 1
NOTE: An 203 mm [8 in.] coin drawer is required for
coin drop operated models.
NOTE: This appliance is suitable for use in countries
having a warm, damp climate.
WARNING
Any disassembly requiring the use of tools must be
performed by a suitably qualified service person.
W299
Models Prepped for Card Reader
The machine is shipped from the factory with the Electronic Con-
trol Diagnostic Harness Assembly unplugged. To avoid unauthor-
ized manual programming or vending, perform the following
steps.
1. Open control panel.
2. Locate diagnostic harness on electronic control.
3. Plug connectors for “white/black” wire and “red/blue” wire
together.
FLW6R_SVG
1
1. Control Panel
Figure 2
Order of Installation Steps
1. Position and level the dryer.
2. Connect dryer to exhaust system.
3. For gas models only, connect the gas supply pipe. Check for
gas leaks.
4. For electric models only, connect the electrical cord.
5. Reverse the door, if desired.
6. Wipe out the inside of the dryer.
7. Plug in the dryer.
8. Recheck steps.
9. Start and run the dryer in a heat setting to verify dryer is heat-
ing.
Position and Level the Dryer
1. Install dryer before washer. This allows room for attaching
exhaust duct.
2. Install the four rubber feet (in accessories bag).
3. Select a location with a solid floor. Dryers installed in resi-
dential garages must be elevated 457 mm [18 inches] above
the floor.
No other fuel burning appliance should be installed in the same
closet with the dryer.
Installation
©
Copyright, Alliance Laundry Systems LLC -
DO NOT COPY or TRANSMIT
11 Part No. D514691ENR8