
Installation instructions

Installation
Before You Start
Supplies
For most installations, the basic supplies you will need are:
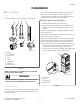
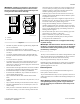
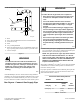
DRY2586N_SVG
8
7
6
5
4
3
2
1
1. Wrench
2. 1/4 inch Driver
3. Screwdrivers
4. Level
5. Gloves
6. Teflon Tape
7. Duct Tape
8. Safety Glasses
Figure 1
NOTE: This appliance is suitable for use in countries
having a warm, damp climate.
WARNING
Any disassembly requiring the use of tools must be
performed by a suitably qualified service person.
W299
Additional Security
Torx security screws are available (as optional equipment at extra
cost) for securing lower access panel to each dryer base. Order
part number 62853.
A Torx bit, part number 282P4, is available (as optional equip-
ment at extra cost) for installing the Torx security screws.
A Torx bit holder, part number 24161, is available (as optional
equipment at extra cost) to be used with the Torx bit.
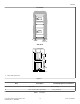
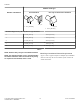
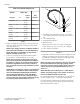
Position and Level the Dryer
1. Install the four rubber feet (in accessories bag).
2. Select a location with a solid floor. Dryers installed in resi-
dential garages must be elevated 18 inches [457 mm] above
the floor.
No other fuel burning appliance should be installed in the same
closet with the dryer.
The dryer must not be installed or stored in an area where it will
be exposed to water and/or weather.
The dryer needs suf
ficient clearance and an adequate air supply
for proper operation and ventilation, and for easier installation
and servicing. (Minimum clearances are shown in Figure 3 ).
3. Place the dryer in position, and adjust the legs until the dryer
is level from side to side and front to back. Leveling legs can
be adjusted from inside the dryer with a 1/4 in. driver.
4. All four legs must rest firmly on the floor so the weight of the
dryer is evenly distributed. The dryer must not rock.
DRY2539N_SVG
2
1
3
4
1. Dryer Base
2. Level
3. Leveling Leg
4. Rubber Foot
Figure 2
Installation
©
Copyright, Alliance Laundry Systems LLC -
DO NOT COPY or TRANSMIT
12
Part No. D516906ENR1