
Instructions / Assembly


Chapter 28 Ductwork
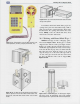
28.9.1 Joining Pipe Lengths
Each pipe length has a plain end and a crimped
end. Lengths are joined by sliding the plain end of one
length over the crimped end of another length. Line up
seams for best appearance and push lengths together for
a tight joint. Fittings are made similarly. The crimped
ends always point in the direction of airflow. Secure
each joint with three drive screws evenly spaced around
the joint and seal with mastic. See Figure 28-24.
Airflow
Bead Crimped end
Plain end
/
Magnetic screw
holder
Drive screw cuts
own hole
Figure 28-24. Joining pipe lengths. Making connections with
round pipe should be step-by-step. A—Each length has a
crimped end and a plain end. B—The crimped end slides into
the plain end of the next pipe until seated against the bead.
C—Three drive screws should be used to secure each joint.
Temporary wire supports are often used to hold pipe steady
while connections are being made.
28.9.2 Cutting Round Pipe
The last length of duct in a run usually must be cut,
Figure 28-25. Do not snap the seam together until
after the cut is made. Hold the last piece of unformed
pipe in place and mark where it is to be cut. Your
cutting mark should be on the plain (not crimped) end.
Be sure to allow enough extra length for the cut end to
slip over the crimped end of the preceding piece, up to
the bead. Draw a straight cutting line across the pipe,
then make the cut with tin snips. When you make the
cut, the tin snips will squeeze the snap-lock seam edge
closed. Before you can form the pipe, you will have to
pry the seam open again, using a screwdriver.
If you need to cut a piece of pipe that is already
formed, use a hacksaw. Make a continuous line around
the pipe to follow while cutting. Support the round
pipe between two wood blocks or other flat pieces,
then saw with smooth, even strokes, beginning at the
seam. Because of the hacksaw frame, you will only be
able to saw part way through the pipe. You will need to
rotate pipe and start again with saw on top. Continue
in this manner until the cut is complete.
28.9.3 Adjustable Elbows
Adjustable elbows can be conformed to the desired
angle. A 90°adjustable elbow can be twisted to form any
angle from 0°-90°, Figure 28-26. A 45° adjustable
elbow is also available. Insert the crimped end to move
with the direction of airflow. Install the elbow and
secure the joint with sheet metal screws, then seal it
with fiberglass tape and mastic. Do not use ordinary
duct tape.
28.9.4 Sealing Collars
Fiberglass reinforcing membrane will wrinkle
when it is wrapped around a joint between round and
rectangular ducts. To make the membrane material lie
Cutting line
Last piece of pipe
A B
Figure 28-25. In a branch run, the last piece must usually be cut to size. A—Mark the cut with a pencil or scratch awl on the