
Instructions / Assembly


Chapter 28 Ductwork
ABC
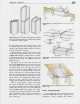
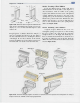
Figure 28-29. How to assemble rectangular duct. A—Match
the ends of the two half sections. B—Start the edge channels.
C—Slide the two sections together.
To form a length, place the two half sections on the
floor with the "S-hook" ends up. Pick up one piece and
engage its edge channels with the channels on the other
piece, then slide the two together.
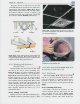
After assembling a section of duct, hammer each
channel snug for a tight fit. This can be done as shown
in Figure 28-30. Hang the assembled duct over a sturdy
board suspended between two sawhorses so the seam
lies flat on the board edge. Use a ball pcin hammer to
tighten the seam.
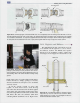
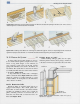
Rectangular duct is joined with "S-hooks" and
drive cleats, Figure 28-31. One end of each section
has formed S-hooks on the long edges and "U" channels
for the drive cleats on the short edges. The other end
has plain long edges, with U-channels on the short
edges. Join pieces by inserting a plain end into the
S-hooks of the next piece, as shown in Figure 28-31B.
Slide drive cleats through the U-channcls to lock the
pieces together, Figure 28-31C. Drive cleats are 10"
long and used on 8" rectangular duct. When the drive
cleats arc in place, bend ends down over duct to
complete and secure the joint. Seal the joint with mastic.
Where a shorter length is required, cut the two
pieces before forming the duct. Always cut the plain
end, not the end with the S-hook connection. Measure
carefully, then cut both pieces to the same length with
tin snips, Figure 28-32. After cutting, use a sturdy
screwdriver to pry the edge channels to their original
form. Cut back the corners of the new end and use a
hand scamcr to form a new U-channel on the short
edge of each piece.
Figure 28-30. Use a ball pein hammer on each seam for a
tight fit.
S-hook
B
U-channel
Figure 28-31. Joining rectangular duct, using S-hooks and
drive cleats.
Figure 28-32. Measure carefully, then use snips to cut duct
pieces to size.
28.10.2 Cutting Openings
To begin branch pipe runs, openings must be cut in
the plenum. Figure 28-33. These openings may be
rectangular or round, depending upon whether a