
Instruction Manual


5SPEKTRUM NX20 • TRANSMITTER INSTRUCTION MANUAL
EN
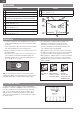
For optimum charging results, the built-in charger requires a USB
power supply capable of at least 2-3A output. Using a power supply
with a lower output will result in very long charge times or the
transmitter not charging if it is powered on while attempting to charge.
The first time the transmitter is charged, the charge time may be
6-7 hours. Charge the transmitter when the low battery alarm
sounds. See the System Settings section for information on setting
the low battery alarm level.
Always charge the transmitter on a heat-resistant surface.
CAUTION: Never change the low voltage limit for Li-Ion
batteries below 3.3V. Doing so could over-discharge the
battery and damage both battery and transmitter.
CAUTION: Never leave a charging battery unattended.
CAUTION: Never charge the battery outside of the
transmitter. Charging the battery outside of the
transmitter may interfere with the battery monitoring system,
which can give false low battery warnings.
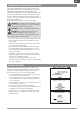
1. Connect a 2-3A USB power supply (not included) to an AC outlet.
2. Connect the included magnetic USB charging cable to the
power supply.
3. Insert the included magnetic micro USB adapter in the USB
port on the back of the transmitter.
4. Connect the USB charging cable to the magnetic adapter.
5. The LED will flash blue while charging. A fast press of the
power switch will bring the Charge Battery icon to the color
touch screen display.
6. Charging is complete when the button is pressed and the
battery capacity icon on the screen shows full. Disconnect the
USB cable once charging is complete.
Disconnect the power supply from the power outlet.
The magnetic micro USB adapter can be left in the transmitter
USB port for future use.
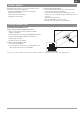
The NX20 transmitter has a WiFi capabilities to enable you to
download updates from the SpektrumRC.com website. You must
start an account at SpektrumRC.com first on your PC, Mac, or
mobile device before you can connect with your NX20
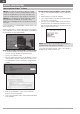
1. Power ON your NX20 and enter the Function menu, Scroll to
the bottom to access the System menu.
2. Scroll down and select Check For Updates. The NX20 will
search for WiFi networks in range and display the options for
you to connect with.
3. Select your WiFi connection. Load the SSID and password for
connection and select Connect.
4. Select Log In and fill in your account information.
5. Select Check For Updates to check for the newest updates on
your NX20, and download them automatically.
6. If you wish to erase your registration information from your
NX20 you may do so. Otherwise, select Log Out to resume
normal operation.
CHARGING THE LITHIUM ION BATTERY PACK
UPDATING WITH WIFI