Instruction Manual SR5 Loudspeaker Spendor Audio Systems Ltd SR5IM1.
IMPORTANT • PLEASE READ THESE INSTRUCTIONS CAREFULLY BEFORE INSTALLING YOUR NEW SPENDOR LOUDSPEAKERS • DO NOT DRILL ANY HOLES OR FIX ANY SCREWS CLOSE TO ANY AC MAINS OR OTHER ELECTRICAL CABLES • DO NOT DRILL ANY HOLES OR FIX ANY SCREWS CLOSE TO ANY PIPES OR CONDUITS • IF YOU ARE UNSURE ABOUT ANY ASPECT OF THE INSTALLATION CONSULT YOUR SPENDOR DEALER OR A QUALIFIED PROFESSIONAL BEFORE PROCEEDING • PLEASE READ THESE INSTRUCTIONS CAREFULLY BEFORE INSTALLING YOUR NEW SPENDOR LOUDSPEAKERS • The Spendo
1 POSITIONING THE LOUDSPEAKERS • The SR5 frequency response is extremely well maintained off-axis. This creates a wide deep precise sound field which allows great flexibility when planning the layout of your room, seating, loudspeakers, and associated equipment (e.g. TV or video screen). Use the following guidelines to determine the optimum positions for your loudspeakers.
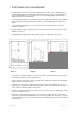
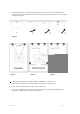
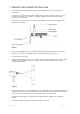
• The wall bracket allows you to adjust the angle of the cabinet to fine-tune the sound field which is especially useful when the SR5 is used as a surround or rear channel loudspeaker or if it is mounted on a ceiling. See figure 4. Figure 4 Figure 5 Figure 6 Figure 7 • Surround/rear loudspeakers should generally be mounted above seated ear level. • Surround (side) loudspeakers should generally be mounted above seated ear level. • Centre channel loudspeaker can be above or below the screen.
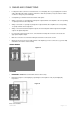
2 BRACKET AND CABINET INSTALLATION • Check that all loudspeaker cables have been prepared and installed. See section 3 Cables and Connections. • The cabinet is secured to the bracket with 2 x M6 hex-drive socket cap machine screws, 2 x spring washers and 2 x stainless steel bushes. See figure 8. ALWAYS store these components safely whenever they are removed. • Remove the two screws and washers using the supplied 5mm hex wrench and carefully detach the bracket from the cabinet.
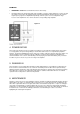
3 CABLES AND CONNECTIONS • Loudspeaker cables can have a noticeable effect on sound quality. Choose good quality low resistance cables with high purity metal conductors and low-loss dielectric (insulation). Ask your dealer for advice on cables to suit your system and budget. • Set amplifier(s) to minimum volume and switch off the power. • Always connect the –ve (usually black) loudspeaker output terminal of the amplifier to the corresponding –ve (Black) terminal on the loudspeaker.
BI-AMPING • IMPORTANT: REMOVE the terminal links and store them safely. • Bi-amping allows two independent audio power amplifier of equal or similar quality to be used for LF and HF signals. The benefits of bi-amping include reduced intermodulation distortion because the low and high frequency signals are amplified independently, and more power reserve and dynamic range because each amplifier has less ‘work’ to do than a corresponding single amplifier.
7 QUERIES AND SERVICE If you require advice or service for your audio system please contact your Spendor dealer. We recommend that you retain all the packaging for your loudspeakers in case you need to transport them safely in the future. 8 WARRANTY All Spendor 'S' Series loudspeakers (‘The Equipment’) are guaranteed against defects in components and materials for a period of 5 years from date of purchase.
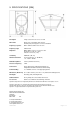
SPECIFICATIONS [SR5] Description 2-way sealed enclosure for use on wall Drive Units 25mm (1in) coated fabric dome tweeter 140mm (5.5in) homopolymer cone bass-mid driver Frequency response 90Hz - 20kHz ± 3dB on reference axis Frequency range -6dB at 70Hz Dispersion Within 3dB of response on reference axis Horizontal: over 40° arc ( ±20°) Vertical: over 20° arc ( ±10°) Sensitivity 88dB SPL (1W, 1m) Harmonic distortion 2nd & 3 rd harmonics (re.