PROGRAMMABLE REFRACTOMETER 300037 SOFTWARE INSTRUCTION MANUAL
Table of Contents Page COMPUTER INTERFACE RS232 Cable Connection …………………………………... 3 Software Installation …………………………………... 3 Serial Port Configuration …………………………………... 3 Set Test Parameters …………………………………... 5 Calibration …………………………………... 5 Measurement Procedure …………………………………... 6 Create Your Key-Values …………………………………... 8 Enter Your Key-Values into the Software …………………………………... 9 Load and manage Custom Scales …………………………………... 14 Search within a Custom Scale …………………………………...
COMPUTER INTERFACE This section will guide you through the process of connecting Programmable Refractometer 300037 to your PC. RS232 Cable Connection CAUTION – DO NOT CONNECT OR DISCONNECT THE RS232 CABLE WHILE THE REFRACTOMETER IS ON! 1. Turn your Refractometer off. 2. Connect the male-end of the provided RS232 cable to the refractometer and the female-end to your PC’s serial port. 3. For continuous use, connect the AC power adapter to the refractometer (or use the internal 9V battery for portability).
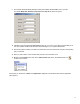
9. The software will automatically attempt to detect the available Serial (COM) Ports on your PC. The default Baud Rate, Data bit, Parity Check and Stop bit are shown in Figure 1. Figure 1 10. Click to select the appropriate Serial Port (COM 1-8). If you are not sure which serial (COM) port to use consult either the Microsoft Window’s Device Manager or your system administrator. 11. Next check that the software can obtain a measurement from the refractometer using the serial (COM) port you selected. 12.
OPERATING YOUR REFRACTOMETER VIA THE SOFTWARE The following section with explain how you may use the software in place of the Refractometer’s keypad to calibrate and operate with your Refractometer. If you have not already done so, you need to select several parameter settings prior to operating your Refractometer. Set Test Parameters 1. Browse to the Setting menu and click on the Parameter Setting OR click on the Parameter Setting icon located on the Toolbar. 2.
If calibration is required: 4. Gently clean the prism with a soft cloth. 5. The refractometer is designed to be calibrated against pure distilled water. Place a few drops on the prism (enough to cover it) and close the black cover. 6. Browse to the Function menu and click on Zero Calibration OR click on the Zero Calibration icon located on the Toolbar. The status bar will indicate when calibration is complete: Measurement Procedure Your refractometer software setup is now complete.
Figure 4 shows a typical display reading.
CUSTOMS SCALES Your Programmable Refractometer comes preloaded with the commonly used Brix and nD (refractive index) scales. In addition you may purchase many application-specific scales from your Sper Scientific Ltd. dealer or create your own custom scales. An unlimited number of scales can be stored in the software’s database. Transfer these from your computer to the three numbered display positions on Programmable Refractometer using the using the built-in RS232 computer interface.
There are several available dimensions (units of measure) used for taking Refractometer measurements, depending on the application and type of substance being measured. A common unit of measure is percentage (%) by weight. Use a high resolution digital balance to produce solutions at various concentrations and equate them to the percentage of dissolved solids by weight. For example: 1ml of H2O is weights approximately 1g. A solution of 9g of water and 1g dry solids produces a 10% concentration.
Figure 8 shows the function side of the Custom Scale screen with an explanation of each function under the Parameter tab. Scale Name: Choose the name you wish to appear in both the “Custom Scale Database” and “Switch Scale” lists. Select Dimensions (Unit of Measure): You may choose either % (Percentage) or ° (Degrees) symbol and under Select Dimension type in the name of the solution as you wish it to appear on your measurement results screen (see figure 4 above) i.e. Sodium Chloride.
You will use the following concentration table to practice creating a custom sodium chloride (NaCl) scale. NaCl % by weight nD 0% 1.3330 5% 1.3418 10% 1.3505 15% 1.3594 20% 1.3684 26% 1.3795 3. Type in the following information in the Parameter section for the sample Custom Scale using the values from the above table. Figure 9 4. Click the Next button to continue to the Input Data section.
5. Enter the nD (refractive index) values and user values (in this case %) from our sample table above.
6. Click on the OK button and the software will plot the curve for your custom scale. Once the software after the software has computed the curve you should see the following graph: Figure 11 7. Click on the Save button to add the scale to your Custom Scale Database.
Loading and Managing Custom Scales The top section of the 'Parameter' tab provides buttons for loading, deleting, importing, and exporting your Custom Scale Database. The drop down menu lists the names of custom scales in your database. These will include all scales purchased and downloaded from a Sper Scientific Custom Scale Software 300038 disk, as well as those you created using this software. For purchased scales: Enter the serial number provided with your Custom Scales 300038 (see Figure 13).
The Scales box (see Figure 15) contains a list of custom scales in your database. The box on the right box lists the scales you have selected for Import or Export. Use the [>>] and [<<] buttons to transfer scales between the two boxes.
Search within a Custom Scale The Search tab (Figure 16) provides a tool for searching your custom scale for the equivalent User Value for a particular Refractive Index value of your solution. Enter an nD value (within the range of your custom scale) and the results will appear in the table on the left. All Search points are noted on the chart. To remove a search point from the data table, click on the Delete button.
Transfer Custom Scales to Your Refractometer Click on the Transfer button to load your custom scale to your Refractometer. A status indicator will show the progress as the software transfers the Custom Scale. Figure 18 Measure with a Custom Scale Close the Custom Scale window, click on the X in the upper right corner. Browse to the Function menu and click on Switch Scale.
Once the Switch Scale dialog box appears, select NaCl and click on OK. (See Figure 19) Figure 19 Now that you have switched to the new Custom Scale, you can measure your test solution of 10% NaCl (by weight) by using the “MEASUREMENT PROCEDURE” (see Page 6) or measure directly on your Programmable Refractometer.
Modify Custom Scales To Modify or to Delete custom scale data from the Refractometer, Browse to File menu and click on Scale Data. Use the [◄] and [►] buttons (see Figure 21) to cycle through all scales including 'Custom Scale' display positions: 1, 2 or 3. The status indicator displays the progress of the Delete operation. Note: Only custom scales can be modified or deleted. Brix and nD scale data is permanent.