Components (® Mount Rubber Pad ® Scratch resistant Pad © cme Tap Button © Micro USB Port @Release Bar GELD indicator 360° Rotating ball @ Push Button ® Rubber Mount Clip
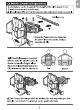
Installation 2 Place the socket lightly onto the One Tap Head, adjust the angle, and rotate the socket clockwise to secure.
CD Slot Size (Clearance) Requirement ‘Smartphone can be mounted I the height of the ots aver 0.2 ich (5) and under 039 helix rent. 4h the siesta ls different from the suggested sie proper mounting ks not possible. The CD slot mount doesn't fit Into the hide's CD soot vertically due to the small in height, please teach thence rubber pads to he CD soot aunts clips for Bette fit. 4 The Top and Bottom parts of the produce can vary depending on the ‘vehicle's canter fascia. The product can be used both ways.
Charging Mode 1. Connect the ca charger tithe ow cigarette lighter socket. 2 Connect the Mira USE cable the car charger and wireless quick charger. D18W Fast car chargers required for wireless quick-charging, Please use the Included ar charger. 3. Blue and green LED flashes ultimately then tums off. 4. Place the smartphone In the middies of the wireless car charges. 5.1 you detach a charging smartphone from the charging ped the blue LED wil um off and go rea sandy mode.
Cautions 1,D0 nat tare ccs force on the product, 2.Do not disassemble the product or let It come into direct contact with heat or water. 3. Long exposure to sunlight can lead to temperature rise and possibly affect the charging process. 4.Be extra cautious of using t under unusual hot and humid weather circumstances to avoid the rut damage. 5. Maggie Mey cause the product to berks ar malfunction; do not place magnetic chip card (e.g. ID cards, red cards) near the product. Medical devices (e.g.
FCC Part 18 Compliance Statement: ‘This device complies with Part 18 of the FCC Rules. CAUTION: Changes or mastication nut expressly approved by the putty response for compliance cooed cold the user's authority to operate the Production NOTE: This equipment has been tested and found to comply with the meets for a wireless power transfer, pursuant to Part 18 of the FCC Rules.
Exigence relative 3 la taille de la gante CD (ouverture) Le proche peut &re monté i in hauteur de a fente est supérieure S mm [02 pouce] et Inférieure 410 vn 0:39 poutou. Ste dea rte ct ferez lle mats un portage cent rst pes ssi | 3. Appuyez sure bouton poussoir pour régler le clip en caoutchouc et Insérez le produit dans a fente CO, Sie support CD n’accroche pes: au lecteur CD A cause de sa petite lle, veules colle ies coussinets en caoutchoucs au support © pou rune meilleure adhérence.
Gula de instalación .Inserte Ia tuerca en Ia junta esférica historie a 360° y acople Cabezuela del de un toque en la junta. 2 Coloque suavemente a terca ena cabeza del de un toque, cara! anguina luego gris a tuerca ala derecha para autista. 0S calducho S nts comer nui con i cabeza ce un toe toe a producir d rea dates.
Visualizan del Indicador LED Encendido Inicial La lur LED azul y verde parpadea alternativamente luego se apaga Encendido en espera LED apagada. Durante la carga €l LED se enciende en azul durante 60 aseguradas y se apaga. ‘Cuando se detecta . bine La luz LED verde se enciende Cuando se detecta el LED parpadear en azul otra anomalía verde de manera altea.