
User Manual
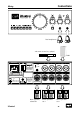


2Control
13
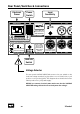
Power Connection
Connect the included power cord to the rear Mains Input. Transformer,
power cord and case connection conform to VDE, UL and CSA require-
ments. Power fuse ratings are 315 mA slow blow (
220-240
volts) or
630 mA slow blow (
110-120
volts).
Power Switch
The rear panel POWER switch activates the unit, confirmed by the
Power LED on the front panel (between the headphone symbols).
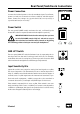
IMPORTANT ADVICE: Switch on the unit only after you have
turned all VOLUME controls fully left, and wait to set your
desired volume level until the unit is powered on. Neglec ting
this can damage either or both your ears and your headphones!
GND LIFT Switch
The rear panel GND LIFT switch eliminates hum by separating the in-
ternal ground from the unit’s housing ground. Hum can, for example,
result when this unit’s housing has a common ground connection with
other machines that might have a different ground potential.
Input Sensitivity IN 2
Inputs IN 1 and IN 2 are gauged to analog line level signals at +4 dBu.
The second input IN 2 can alternatively be set to another input sensi-
tivity of -10dBV nominal level with the switch next to the IN2 inputs. A
nominal level of +4 dBu represents the international standard of pro-
fessional studio equipment, -10dBV corresponds to the standard in
consumer electronics, for example a CD/DVD-Player for home use.
If the switch is actuated, IN 2 is set to +4 dBu, if the switch is not actu-
ated, sensitivity of IN 2 is set to -10 dBV. If you connect a unit adjusted to
-10dBV to a +4 dBu input, the signal is too quiet (and too loud vice versa).
In this case change the switch position accordingly.
Rear Panel/Switches & Connections