
User Manual

14
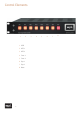
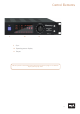
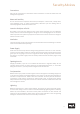
Control Elements
1 USB
By pressing the push button labeled USB the signal connected to the USB port is routed to
the DA converter. When the USB input is active, the USB push-button is illuminated.
2 AES 1
By pressing the push button labeled AES 1 the signal connected to the USB port is routed
to the DA converter. When the AES 1 input is active, the AES 1 push-button is illuminated.
3 AES 2
By pressing the push button labeled AES 2 the signal connected to the AES 2 port is routed
to the DA converter. When the AES 2 input is active, the AES 2 push-button is illuminated.
4 Coax 1
By pressing the push button labeled Coax 1 the signal connected to the Coax 1 port is
routed to the DA converter. When the Coax 1 input is active, the Coax 1 push-button is
illuminated.
5 Coax 2
By pressing the push button labeled Coax 2 the signal connected to the Coax 2 port is
routed to the DA converter. When the Coax 2 input is active, the Coax 2 push-button is
illuminated.
6 Opt 1
By pressing the push button labeled Opt 1 the signal connected to the Opt 1 port is routed
to the DA converter. When the Opt 1 input is active, the Opt 1 push-button is illuminated.
7 Opt 2
By pressing the push button labeled Opt 2 the signal connected to the Opt 2 port is routed
to the DA converter. When the Opt 2 input is active, the Opt 2 push-button is illuminated.
8 Mute
When the Mute button is engaged, the output signal of the Mercury is muted – both the
FIX OUT and the VAR OUT signal. When the mute function is active, the button is illumina-
ted red.