Visit our website before returning to store For Spanish, vist our website * Para Espafiol, visite nuestro sitié web 1-1-32-931 PL Assembly, Instructions and Rules 313 Waterloo Valley Road / Budd Lake, NJ 07828 / www.sporicraft.
Congratulations! We hope you will have many hours of enjoyable use with your new Billiard Table/ Dartboard Cabinet! ./ Sportcraft PLEASE KEEP YOUR INSTRUCTIONS! « Your Model number is necessary should you need to contact us. « Please read through this instruction book to familiarize yourself with all the parts and assembly steps. « Refer to the Parts Identifier and verify that all parts have been included. « For questions that may arise or for missing PLEASE CONTACT US BEFORE THE GAME TO THE STORE.
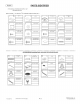
PARTS IDENTIFIER FOR MISSING OR DEFECTIVE PARTS, VISIT www. sportcraft.com (Add a Check (\ ) to the box! 7! to indicate receipt of each part.) f @) N LEG-A (2) LEG-B TOP LEG CAP BOTTOM LEG CAP.
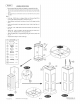
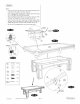
English We ASSEMBLY INSTRUCTIONS: recommend that two adults work together to assembie this table. The table will be assembled upside down and then turned over onto its legs. This is a very heavy table and turning it over will require at least two strong adults. We suggest that you use the bottom carton as a clean flat work area to protect the table. FIG. 1: Fold Leg - B (#2) into an L-shape. Attach one Top Leg Cap (#3) to Leg - B (#2) using two Bolts (#11) as shown in Flg. 1.
FIG. 2: Attach one Lower End Apron (#7) between the two leg assemblies using four Bolts (49) and four Washers (#6). Repeat the same for the other Lower End Apron. See Figures 2 and 2A. Attach one Lower Side Apron (#8) between the leg assemblies using four Bolts (#9) and four Washers (#6). Repeat the same for the other Lower Side Apron. See Figures 2 and 2B. 4-1-32-931 PL , (Continued on the next page.) P.4 ©2009 Sportcraft, Lid. www.sportcraft.
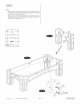
FIG. 3: Open the hook-and-loop tabs found on the pockets and adhere them to the inside of the aprons. See Figs. 3B and 3C. With two strong adults carefully place the billiard cabinet onto the leg frame. CAUTION: Do not lift by the pockets. Attach the Billiard Cabinet (FA6) to the Leg frame using four Bolts (#14) and four Washers (#10) under the table. See Fig. 3A.
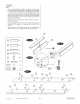
PARTS IDENTIFIER FOR MISSING OR DEFECTIVE PARTS, VISIT www.sportcraft.com (Add a Check (\ ) to the box! 7! to indicate receipt of each part.) f (7) Wo | CUE RACK HEADER ne BOARD (18) : tee CUE RACK TOP BOARD. (is) 9-3-32-931PL27 (1) (a1) t CUE APR EOTTOM (2) 9-3-32-931PL30 (1) 25 -- : UPPER CUE RACK : 30) -- (23) i @y LEET DOOR (27) LOWER CUE RACK 31) 3.5 X14 MM FLAT HEAD ' LEFT BOARD 9-3-32-931PL33 (1) : bee (38) 38)
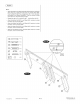
FIG. 4: Screw Locking Pin(#47) into Plastic Screw(#A19) which has been pre-installed in the Front Board(#23).Then attach Bottom Board(#22) to one Front Board (#23) using one Locking Pin (#47) forming an “L” shape as shown in Figs. 4A, 4B, and 4C.Note: Make sure the arrow on the screw point out to Locking Pin #47).Insert Locking Pin (#47) into Locking Screw (#A17) which has been pre-installed in the Bottom Board(#22) .Then turn arround Locking screw (#A17) in clock wise till pin is locked.
FIG. 5: Attach the Botiorn/Front Board Assembly (#22 and #23) to Left Board (#24) using two Locking Pins (#47) and two Dowels (#48). Note: Insert Locking Pin (#47) into Locking Screw (#A17) which has been pre-installed in the Bottom Board(#22) .Then turn arround Locking screw (#A17) in clock wise till pin is locked. Repeat this step to Per Locking Pin (#47) , Locking Screw (#A19) Attach the Bottom Shelf (#21) to Left Board (#24) Pins #47) and two Dowels (#48).
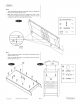
FIG. 6: « Attach the Right Board (#25) to the Assembly using two Locking Pins (#47) and two Dowels (#48) per board. « Note: Insert Locking Pin (#47) into Locking Screw (#A17) which has been pre-installed in the Bottom Board(#22) .Then turn arround Locking screw (#A17) in clock wise till pin is locked. A17 FIG. 7: « Attach the Back Board (#28) to the Assembly (#35) as shown in Fig. 7. using fifteen Screws « Attach the Header Board (#17) to the Assembly (#34) as shown in Fig. 7A.
FIG. 8: Attach the Upper Cue Rack (#29) to the Right Door #27) using Screws (#34). Attach Lower Cue Rack (#30) to Right Door (#27) using two two Screws (#34). Attach Dart Holder (#36) to Right Door #27) using two Screws (#34). Repeat the above steps for the Left Door (#26). using two Screws (#38) in each ° * Qe @ ° bbidi 1 B| 7 [ | Attach the Doors to the assembly hinge. See Fig. 8A. Oo. 1-1-32-931 PL 9° 9 P. 10 ©2009 Sportcraft, Lid. www.sporicrafi.
FIG. 9: « Place the Dartboard Cabinet against the wall where you desire to play in order to mark the screw location. Use a pencil to mark the four screw holes found at the top and bottom of the cabinet. Also mark two holes needed in the center for the Mounting Bracket (#41). See Figures 9 and 9A. « Insert the Screw Anchors (#39) into the wail at the marked locations behind the cabinet. « Attach the cabinet to the wall using four Screws (#38), screwing into the anchors.
FIG. 10: « Attach three Bumpers (#32) to the back of the Dartboard (#40) using three Nails #33). They should each be 7%” (19.05cm) from the center hole. See Fig. 10 « Place one Screw (#31) into the center of the dartboard so that the screw is firm but sticking out, about one-third of the way in the board. « Place the Dartboard #40) onto the Mounting Bracket in the cabinet. See Figures 10 and 10A. « Peel Eva Foam(#44) and stick on the cabinet as shown in Fig10 and 10B.
TABLE MAINTENANCE (MANTENIMIENTO DE LA MESA) Keep your table covered. If there is dust on the playfield or the aprons, use a vacuum or use the brush provided to remove. Do not sit on the table and do not use the table outside. For location of the black bail spot, please refer fo Illustration No. 1 for positioning it correctly on the foot spot. TABLE (Mesa) Cubrir su-mesa. Si_hay-el palvo sobre el campo.de juego. o los guarniciones, usar-un-vacio_o.el cepillo proviso para quitarlo..
or the cue ball or any object ball must come into contact with a rail. (Note: It is legal for the shooter to bank the cue ball off a rail before hitting the object bail.) Aplayer who legally pockets a ball continues play until missing or committing a Foul. Once a player’s ball group (stripes or solids) is pocketed, the player may play the 8 ball. Again, the player must clearly indicate the intended pocket, even if it appears obvious.
the intention of playing a Push Out before the shot, or it is considered normal play. Any ball pocketed on a Push Out does not count and remains pocketed (except the 9 Ball). Following a Push Out, the incoming player: a) must shoot from that position or b) may pass the shot back to the other player. FOULS: 1. Failure to execute a legal shot as defined above. 2. Failure to make first contact with the lowest numbered ball on table. 3. Ascratch shot (shooting the cue ball into a pocket or off the table) 4.
In doubles, the server first makes a good service and the receiver returns the ball. Then the partner of the server makes a good return, followed by the partner of the receiver returning the ball. Thereafter,ch player alternately in that sequence makes a good return. A GOOD SERVICE: Service begins with the ball resting on the palm of the free hand, which must be open and flat. The server then projects the ball upwards and strikes it before the ball touches anything.
AMATCH: Amatch consists of the best of three games or the best of five games. Play is continuous throughout except that any player is entitled to claim an interval of not more than two minutes between successive games of a match. THE CHOICE OF ENDS AND SERVICE: The choice of ends and the right to serve or receive first in a match shall be decided by a toss. The winner of the toss may: -- choose to serve or receive first, and then the loser has the choice of ends.
DARTBOARD MAINTENANCE: 1. NUMBER RING (SPIDER): Make sure to rotate the number ring (or spider) regularly in order to even out areas of wear. 2. TOE LINE: Select a suitable location with about 2.5 m (8 feet) of open space. “Toe-line” should be 2.37 m (7 feet 9 1/4 inches) from the face of the board for throwing distance. TIPS AND TECHNIQUES TIP 1: Aproper stance is to align your hand, elbow, shoulder, hip and foot. If you are using right hand, then turn the right side of your body facing the board.
English Bullseye (Score 50) Doubles Ring (Score 2X number) Single Ring (Score 1X number) 25 Ring (Score 25) Triple Ring (Score 3X number) ROUND THE CLOCK: In this game, the player tries to hit the numbers from 1 to 20 in order. When a number is hit, then the game is advanced for shooting the next number. The player who reaches and hits 20 first is the winner. Doubles and triples are treated the same as a single, being counted as one hit.
& SPORTCRAFT # LIMITED WARRANTY Limited Warranty Sportcraft, Ltd. (the “Company”) warrants the Product to be free from defects in workmanship and materials under normal use and conditions FOR APERIOD OF 90 DAYS FROM THE DATE OF ORIGINAL PURCHASE in the United States and Canada. Product Registration Card The Product Registration Card must be filled out completely and mailed to the Company at the address printed on the card within 10 days from the date of your purchase of the Product.
a. Sportcessories 313 Waterloo Valley Road Budd Lake, NJ 07828 www.sportcraft.com PARTS RE-ORDER FORM # 1-1-32-931 PL - BILLIARD / DARTBOARD NAME: DATE: ADDRESS: PHONE: CITY: STATE: 9-3-32-931PL02 9-3-32-931PL03 Leg Top 9-3-34-872PL30 18 mm Washer ower Cabinet - B L CUT HERE OOP ™ ZIP CODE: DESCRIPTION | Gop hop PART # Oo} Cr QUANTITY REF | oRDERED UNIT PRICE 12.00 12.00 .00 .00 00 15 10.00 10.00 15 15 15 1.00 15 15 .00 15 15 ea ea ea ea ea @a ea ea ea @a ea ea ea a ea @a ea .
a. PAGE 2 OF 2 Sportcessories 4 PARTS RE-ORDER # 1-1-32-931 Budd Lake, NJ 07828 www.sportcraft.
1-1-32-931 PL ©2009 Sportcraft, Lid. www.sporicrafi.
1-1-32-931 PL ©2009 Sportcraft, Lid. www.sporicrafi.