
User Manual

Congratulations on your purchase of a Sportwerks 26
engine! Precision manufactured and assembled, your
Sportwerks 26 will provide you with trouble-free
performance if you read and follow these instructions.
Using the Proper Fuel and Glow Plug
Using the proper fuel and glow plug is critical in order to
achieve maximum performance and reliability. You must
use fuel, glow plugs and air filters that are specifically
designed for model car/truck/buggy applications. Never
use any type of model airplane glow fuel! Use of
model airplane fuel will damage your engine and
immediately void any warranty. We recommend using Blue
Thunder
™
or Blue Thunder Race Formula blend fuels with
20% nitro, providing the best combination of power and
fuel economy. Dynamite
®
Blue Thunder Fuels are
vigorously tested, researched and formulated to deliver
excellent power as well as engine protection. A glow plug
has been included and is ideal for breaking-in your new
engine. In fact during the break-in procedure, it is not
uncommon to go through one or two glow plugs, as
microscopic bits of metal (from the cylinder/piston wearing
in) bond themselves to the plug element causing glow plug
failure. We recommend the Sportwerks #3 Glow Plug
(SWK8058) as the best glow plug for this engine. The #3
plug has been designed to deliver an ideal balance of
performance and longevity. All car engines must use a
properly oiled air filter to keep dirt out of the engine. Any
dirt that enters the carburetor can immediately destroy your
engine! We recommend SWK3232 as an excellent choice
for a quality air cleaner.
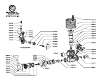
Carburetor Adjustments
Your Sportwerks 26 engine comes equipped with a
precision slide-valve carburetor. Take a moment to review
the pictures below to familiarize yourself with the various
functions of the carb. Loosening the nut located on the
side of the crankcase under the carburetor body will allow
you to rotate the carburetor. Make certain to mount the
throttle arm to the side required by your particular vehicle.
Although preset at the factory, some changes in the
needle setting can occur during shipping and handling.
We suggest the following settings for breaking in
your engine:
High-Speed Needle: 3
1
/
2 turns out (counterclockwise)
from closed.
Low-Speed Needle: 2 turns out (counterclockwise)
from closed.
When checking the adjustment of the low-speed
needle, it is crucial that the throttle slide is
closed completely when turning the needle
and that you do not overtighten the needle.
Use a Dynamite
®
engine-tuning screwdriver
(DYN2775) to make this job easier. When you
feel resistance in the needle, immediately stop
turning and begin turning the needles
counterclockwise, counting the number
of turns from “closed.”
Starting Your Engine For The First Time
The first start of your engine is the most critical time of
the engine’s life, dictating how well it will perform. After
installing the engine in your model and inserting the glow
plug, turn on your radio system and attach a glow igniter
to the glow plug.
When using a recoil starter, never pull the rope out to its
full length, as doing so may cause damage and recoil
starter failure. Quick, short pulls of the recoil starter are
the best technique to use. Never extend the starter rope
more than 12 inches.
Should the pull starter be extremely difficult to pull (will
not extend out of the assembly), the engine may be
flooded (hydro-locked). Excess fuel between the cylinder
head and piston will not allow the piston to travel through
its full range of compression, effectively "locking up" the
engine. Should this occur, immediately remove the glow
igniter from the plug. Using a quality glow plug wrench
(DYN2510), remove the glow plug and turn the model
upside down. Give the recoil starter a few short pulls to
clear out the fuel, re-install the glow plug and start again.
We recommend using an electric starter or starter box for
the initial starts, even with a pull-start equipped engine.
You may need to "blip" the throttle on the transmitter
(applying throttle on/off) while trying to start the engine,
as new engines are more difficult to start due to the tight
piston/cylinder fit. Never start an engine above 1⁄4
throttle! Immediate damage to your engine can
and will occur!
When the engine starts, the exhaust should emit lots of
blue/white smoke, indicating that the engine is
excessively rich (a good thing during break-in). During
the first tank of fuel, you may wish to set a higher than
normal idle speed and/or leave the glow plug igniter
attached in order to keep the engine from stalling. Drive
your vehicle around while "blipping" the throttle and
avoid operating the engine at full throttle for more than
2–3 seconds at a time. Consume the entire first two tanks
of fuel in this manner. After the first two tanks of fuel,
begin leaning out the high-speed needle valve 1/8 turn at
a time. It generally takes about 5 or 6 tanks of fuel before
you want to start tuning for "maximum" power. Do not
skip this process of breaking in a new or rebuilt
engine! Should you choose not to follow these
procedures, you risk damaging your engine
during the first tank of fuel.
Your patience during these procedures will be rewarded
by an engine that performs reliably and to its maximum
power potential. First run attempts can be more frustrating
than with other (less powerful) sport engines, so take
your time—it will be worth the wait! Glow plug failure is
a common occurrence when breaking in a new engine. To
test your plug, let the engine idle at a properly adjusted
low-speed needle setting with the glow igniter attached.
Then, remove the igniter. If you hear no appreciable
change in engine rpm, the plug is still good. If the
engine loads up and the rpm’s decrease, it’s time to
replace the glow plug.
Setting the Needle Valves
When tuning the needle valves for maximum
performance, adjust them is small increments, 1⁄8 turn
at a time. An engine should not be run too lean; doing
so severely shortens the life of the engine. When an
engine is set too lean, it will run very strong at first but
will soon begin to sag and hesitate or stall when
accelerating. The best way to tune an engine is by using
an infrared temperature gauge, but you can also use water
to check the head temperature. (Refer to "Tuning the
High-Speed Needle" below.)
Tuning the High-Speed Needle
To obtain the correct high-speed needle setting, start the
engine and drive your vehicle around for a minute or two,
applying full throttle for periods of 5 seconds or more.
Place a drop of water on the cylinder head. If the water
sizzles away (evaporates immediately) the needle setting
is too lean. A correct needle setting will result in the water
evaporating after 3-5 seconds. If the water does not
evaporate, chances are good that the needle setting is too
rich. Lean the needle 1/8 of a turn and run the engine
again, adjusting the needle setting to get the desired
evaporation time. Check the temperature each time
you change the needle mixture. Do not let the
engine overheat, as this will damage the engine!
Tuning the Low-Speed Needle
The low-speed needle (also referred to as the idle mixture
or idle needle) should be set after you’re satisfied with the
high-speed needle setting. After achieving the proper
operating temperature, reduce the engine throttle to idle
and pinch the fuel line for 3-5 seconds with your fingers
close to the carb fuel inlet nipple. If the engine dies
immediately, the low-speed needle is set too lean. If the
rpm’s increase dramatically, the setting is too rich. The
ideal setting results in the rpm’s increasing just a slight
amount after pinching the fuel line.
Sportwerks .26
Owner’s Manual
Leaner
Low-Speed
Needle Valve
High-Speed Needle Valve
Idle Stop Adjustment
Fuel Inlet
(Adjustable)
Faster Idle
(clockwise
)
Slower Idle
(counterclockwise)
Leaner