
User's Manual


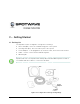

Table Of Contents
- Technical Support
- Important Safety Information
- LIMITED WARRANTY AND LIMITATION OF LIABILITY:
- 1 - Introduction
- 2 - Getting Started
- 3 - Installation
- 4 - Mounting the DU and CU
- 5 - Display Information
- 6 - Trouble-Shooting
- Appendix A - SpotCell 100 System Specifications
- Appendix B - SpotCell 111/112 System Specifications
- Appendix C - SpotCell 163 System Specifications
- Appendix D - SpotCell 167 System Specifications
- Appendix E - SpotCell 141/142 System Specifications
- Appendix F - Safety Hints

GETTING STARTED
4 SpotCell® 100 Series
Note: Parts are provided for the majority of installation options, but do not cover all
possibilities. You may need to purchase additional hardware specific to your mounting
environment before you begin the installation. A tripod and mast would be typical
additional equipment purchased for mounting the SpotCell DU on a rooftop.
Figure 2.2: Components of SpotCell 141/142 Dual Band package
2.2 Unpacking
Physically inspect the box for shipping damage before unpacking the SpotCell System.
1. Remove the SpotCell components from the box.
2. Remove all packing material from the Donor Unit (DU) and the Coverage Unit (CU).
Save the packaging in case the SpotCell System is ever stored or shipped to
SpotWave for service.
3. Check the contents of the package to make sure you have received everything
ordered and verify that the mounting kit contains all the listed parts.
4. Check the DU and CU for shipping damage. Pay particular attention to the unit’s
outer shell casing.
CU
DUs
Cables