Assembly Manual Assembly Manual Counter & Bar Height Swivel Stool CAUTION THIS ASSEMBLY MANUAL CONTAINS IMPORTANT SAFETY INFORMATION. PLEASE READ AND KEEP FOR FUTURE REFERENCE.
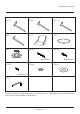
Assembly Manual A1×1 A2×1 B1×1 B2×1 C×1 D×1 E×1 H1×4 H2×4 M6x50mm H3×4 H4×4 M6x30mm H5×4 M6x20mm T1×1 Please read through the instructions below to familiarize yourself with the parts and steps before assembly.
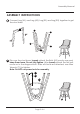
Assembly Manual ASSEMBLY INSTRUCTIONS Connect Leg (A1) and Leg (A2), Leg (B1) and Leg (B2) together to get the stool base. A2 B2 B1 A1 2 Flip over the stool base. Loosely attach the Bolts (H2) one by one and keep them loose. Do not fully tighten. After loosely attach the first bolt, move on to the diagonal bolt. After all 4 bolts are attached, use Allen Wrench (T1) to tighten. Note: Do NOT use power tools for assembly.
Assembly Manual 3 Attach Swivel Plate (E) to assembled stool base in Step 2, using Longest Bolts (H1) and Allen Wrench (T1). Note: Do not fully tighten yet. T1 E E E H1 Rotate the swivel plate by 45 degree first. Put assembled stool base in Step 3 on a flat surface. Push legs up or down as necessary to level. Once level, fully tighten all bolts.
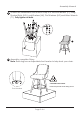
Assembly Manual 5 Attach the assembled stool base in Step 4 to the Seat Bucket (C), using Shortest Bolts (H3), Lock Washers (H4), Flat Washers (H5) and Allen Wrench (T1). Fully tighten all bolts. T1 H3 H4 H5 T1 H3 H4 H5 C C 6 Assembly complete. Enjoy. Note: Each leg has an adjustable foot leveler to help level your chair. CAUTION:PINCH POINT. Please keep hands clear during swivel.
Assembly Manual PRODUCT WARRANTY · 1-year limited on cover against splitting, peeling, and/or tearing. · 1-year limited on internal and external frame structure. · 1-year limited on cushioning material, seat springs and mechanism. CARE & MAINTENANCE Water Based Cleaner ‘W’: Spot clean using the foam only from a water-based cleaning agent such as a mild detergent or non-solvent upholstery shampoo product. Apply foam with a soft in circular motion. Vaccum when dry.