IM-441C IM-661C IM-1109C Thank you for selecting SPT Automatic Ice Maker! To ensure the proper operation of this ice maker, please read the instruction manual carefully before use and keep it in a safe place.
Electrical Requirements 3-4 Control Panel 4-5 Ice Storage & Sounds Storage 6 Disposal 6 8 9 Warranty
·Do not connect or disconnect the electric plug with wet hands. ·Never clean the ice maker with ammable uids. These fumes can create a re hazard or explosion. Do not store gasoline or other ammable vapors/liquids in the vicinity of this or any other appliance. ·Always turn unit off and disconnect power and water line before servicing. ·Replace all panels after servicing or maintenance. ·Do not attempt to repair or replace any part of the ice maker unless specically recommended by the manufacturer.
1. Power Switch 2. Display Panel 3. Ice Maker Door 4. Shelf 5. Water Reservoir 6. Ice Full Sensor 7. Ice Storage Cabinet 8. Power Cord Squeeze Hose Clamp 9. Water Inlet 10. Drain Spout 11. Drain Outlet 12.
Electrical Requirements Read all safety precautions listed at the beginning of this manual. It is recommended to use a dedicated circuit for this ice maker. Do not use receptacles that can be turned off by a switch or pull chain. The ice maker is equipped with a 3-prong grounding plug. To minimize possible shock hazard, the cord must be plugged into a mating 3-pronged and grounding-type wall receptacle. Do not cut or remove the ground prong.
1. Install the Squeeze Hose Clamp to one end of the Water Drainage Pipe. 2. Connect the end with the clamp to the Drain Outlet located at the rear of the ice ice maker. Be sure the clamp is rmly over the drain hose and drain spout connection (refer to image on right). 3. Attach the other end to drain receptacle. 4. Connect one end of the Water Inlet Tube to your water source. Connect the other end to the Water Inlet located at the rear of the unit.
• If any error or failure occurs, the FAULT indicator will illuminate and ice production stops. Please refer to Troubleshooting page. • Switch off the ice maker and disconnect from power supply when not in use. • If unit powered off for any reason, please wait at least 3-5 minutes before powering it back on. This is to protect the compressor. ICE STORAGE The ice maker will automatically shut off when the ice storage cabinet is full. The ice storage cabinet is insulated but not refrigerated.
STRANGE TASTE If the ice has a strange taste. If the ice has developed an unappealing taste or there is musty odor in the unit, clean the interior following steps above. Soak the inlet hose in hot water with couple tablespoons of baking soda for couple hours. Drain the solution, rinse thoroughly and reinstall. Run the ice maker and discard the rst two batches of ice.
If the unit appears to be malfunctioning, please wait for the unit to stop automatically. The issue may be solved by referring to the table below. However, do not open to check or repair the unit unless instructed to do so. Note · The RUN light does not come on when unit is powered on. It is on when the compressor is running. · The ice maker has a self-checking feature. Any fault will be displayed in the display panel with different lights ashing.
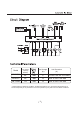
Model Ice making capacity (lb/24h)* IM-441C 44 280 9 13.5W x 20.5D x 23.88H IM-661C 66 300 15 16W x 22D x 26.88H IM-1109C 110 420 15 16W x 22D x 26.88H Ice Storage (lb) Unit Dimension (in.) * Tested under the following conditions: ambient temperature 77°F and water temperature 50°F. The actual quantity of ice produced in a 24-hour period may vary with room and water conditions.
Your Guarantee If this product is found to be faulty as a result of faulty materials or workmanship within one year from date of purchase, it will be repaired free of charge. This guarantee is subject to the following terms: Sunpentown must be notied of the fault. Proof of purchase must be presented to Sunpentown's nominated representative. The warranty will be void if the product if modied, misused or repaired by an unauthorized person.