Instruction Manual 1.6 CU. FT.
Contents 1. SAFETY WARNINGS............................................................................................................ 1 2. INSTALLTION...................................................................................................................... 2 3. PRODUCT OVERVIEW ........................................................................................................ 4 4. OPERATION.............................................................................................
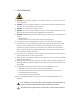
1. SAFETY WARNINGS Caution: risk of fire 1) WARNING―Keep ventilation openings, in the appliance enclosure or in the built-in structure, clear of obstruction. 2) WARNING―Do not use mechanical devices or other means to accelerate the defrosting process, other than those recommended by the manufacturer. 3) WARNING―Do not damage the refrigerant circuit.
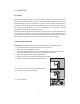
2. INSTALLTION 2.1 Location When selecting a position for your unit, please make sure the floor is flat and firm. The room should be well ventilated with an ambient room temperature between 61°F and 100°F. Avoid locating your unit near a heat source, e.g. cooker, boiler or radiator. Also avoid direct sunlight as it may increase the electrical consumption. Extreme cold temperatures may cause the unit not to perform properly. This unit is not designed for use in garage or outdoor installation.
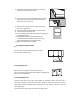
) Slide the door downwards and off the top hinge pin. Lift and remove door, place to side. 6) Remove the two screws from top bracket and transfer to the other side. You will need to first remove the plastic caps on the other side. 7) Slide the door back onto the top hinge, be sure the door is the right way up. 8) Screw the bottom hinge into place on the new side. 9) Place the foot on the other side. 10) Cover the top of door hinge with plastic cover by gently pushing into position.
2.6 Before Using Your Unit Before placing any food in your unit, turn it on and wait for 24 hours to make sure it is working properly. This will also allow the unit to fall to the correct temperature. Your unit should not be overfilled. • • Before Plugging - Please check that you have a wall socket that is compatible with the plug supplied. Before Turning On – Please allow unit to sit for a minimum of 2 hours, allowing the coolant to settle. 2.
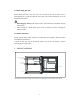
4. OPERATION 4.1 Switching On Your Unit • • • • Before connecting the unit to power supply, please make sure the thermostat control dial is set at OFF position. The control is located to the right of the freezer box. Connect power. Adjust the thermostat control dial to the desired position, bear in mind that the higher the number, the colder the temperature. The unit may not operate at the correct temperature if it is in a particularly hot or a particularly cold room, or if the door is opened frequently.
5.2 Cleaning the Interior and the Exterior of the Unit • • • • Remove shelves and the salad bin. Wipe the inside of the unit with a weak solution of bicarbonate soda and then wipe clean with a “wrung-out” sponge or clothe of warm water. Wipe completely dry before replacing the shelves and salad bin. Use a damp cloth to clean the exterior and finish with a standard furniture polish. Make sure the door is closed to avoid the polish getting on the door seal or inside the unit.
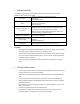
7. TROUBLESHOOTING The following simple issues can be handled by the user. Please call the after-sale service department if the issues are not settled. Unit is not plugged in. Check outlet and circuit. No power Low voltage. Power failure power. Odorous foods should be closely wrapped. Check for any rotten food. Odor Clean the interior. It is normal for the unit to operate for longer periods of time during the hotter days when ambient temperature is higher.
• • • • Overloading the appliance forces the compressor to run longer. Foods that freeze too slowly may lose quality or spoil. Wrap foods properly and wipe containers dry before placing them in the refrigerator. This cuts down on frost build-up inside the appliance. Do not line the storage bin with aluminum foil, wax paper or paper towel. Liners interfere with cold air circulation, making the appliance less efficient. Organize and label food to reduce door openings and extended searches.
Your Guarantee If this product is found to be faulty as a result of faulty materials or workmanship within one year from date of purchase, it will be repaired free of charge. This guarantee is subject to the following terms: • Sunpentown must be notified of the fault. • Proof of purchase must be presented to Sunpentown’s nominated representative. • The warranty will be void if the product if modified, misused or repaired by an unauthorized person.