® OWNER'S MANUAL DEHUMIDIFIER Thank you for selecting our quality appliance. Please be sure to read this user manual carefully before using. Any question, please contact the professional service for help.
CONTENTS IMPORTANT SAFEGUARDS IMPORTANT GROUNDING METHOD ELECTRICAL CONNECTIONS SOME NOTIONS ON HUMIDITY PRODUCT OVERVIEW OPERATION AUTOMATIC DEFROST LOCATION REQUIREMENTS CLEAN AND MAINTENANCE CLEAN THE DEHUMIDIFIER CLEAN THE FILTER END OF SEASON OPERATIONS START OF SEASON CHECKS TROUBLESHOOTING ERROR CODES
IMPORTANT SAFEGUARDS » Disconnect the appliance from its power source during service and when replacing parts and cleaning. » Please note: Check the rating label for the type of refrigerant gas used in your appliance. » Specific information regarding appliances with refrigerant gas. The appliance is recommended not to pierce the cooling circuit of the machine. At the end of its useful life, deliver the appliance to a special waste collection center for disposal.
IMPORTANT SAFEGUARDS » Always grasp the plug when plugging in or unplugging the appliance. Never unplug by pulling on the cord. It can result in the risk of electrical shock and damage. +» Install the appliance on a sturdy, level floor capable of supporting up te 110Ibs (50kg). Installation on a weak or uneven floor can result In the risk of property damage and personal Injury. IMPORTANT GROUNDING METHOD This product is factory equipped with a power supply cord that has a three-pronged grounded plug.
SOME NOTIONS ON HUMIDITY Air always contains a certain amount of water in the form of vapor. This determines the level of humidity in an atmosphere. The capacity of the air to hold water vapor increases with temperatures. Tt why in our homes, as soon as the temperature decreases, the vapor contained in the air condenses, as is evident on the colder surfaces in the room, such as the windows, walls etc.
PRODUCT OVERVIEW COMPONENT DESCRIPTION 1.Air outlet 8.Casters 2.Control panel 7.Air intake grille 3. Handle 8. Drainage hole 4. Bucket 9. Power cord 5. Water level view window Note: All the illustrations in this manual are for explanatory purposes only. Your appliance may be slightly different. ACCESSORIES Before use, remove the accessories from the bucket Remove the bucket, rotate the handle to the position like illustrations below, and remove the handle; Remove the cover, take out of the accessories.
PRODUCT OVERVIEW THE ACCESSORIES INCLUDE: (Note:The accessories are either in the packaging or the bucket.) dy, Castors 4 pes 0 ® Pump drain connector 1 set and gasket Pump drain pipe O (about 16.4 feet) 1st For Model No. SD-54PE only. INSTALL THE CASTORS Tilt the unit no more than 45°and forcibly insert the casters. Make sure the plate of the castors is flush against the bottom of the unit.
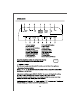
OPERATION © Bum Fl fh Unfit Hon PUMP FILTER FAN SPEED tt 1 [ TIMER POWER 1.Power indicator 2.Lock indicator made Indicators 4 Display screen 5.Fan speed indicators 6.Clean Liter Indicator 7.Bucket Full indicator 8.Timer Indicator 9.Pump indicator * Insert the plug in the socket, the unit goes to stand-by, and the screen display as the illustration shown: » “POWER ” button button B.Timer button C.Mode button D.Increase button E. Dscrease button F.Fan speed button G.Filter Reset H.
OPERATION » Fan speed button Press the “ FAN SPEED " button to select the fan speed: High or Low. And the corresponding indicator lights up. © Timer button This timer can be used to delay the appliance start-up or shutdown. This avoids wasting electricity by optimizing operating periods. « Programming start-up 1. Turn on the appliance, choose the mode you want. For example, Dehumidify mode and high fan speed. Turn off the appliance. 2.
OPERATION » Child lock 1. To lock the control panel, press and hold the “Timer” button for 3 seconds. Locking the control panel prevents someone from accidentally changing the settings. When it's locked, the “LOCK” indicator will light up. 2. Press and hold the “Timer” button for 3 seconds to unlock the control panel. * Bucket full 1. When bucks is full, the compressor will shut off first. The fan will stop in a few minutes, and makes a beeping noise with "Bucket Full” indicator flashing. 2.
OPERATION ® Continuous drain Connect the garden hose on the back of unit, and then the unit can continuous run without emptying the bucket. 1) Put the unit on level floor, unscrew the cap on the drainage hole; 2) Install the garden hose (which has an outer diameter of 1 1/16 inches, or 27.0mm, and a pitch of 11.5 TPI} on unit; 3) Press "POWER" button to run the unit. Note: Please install the garden hose by following the pictures below.
CONTROL PANEL » Pump drain (Model No. $SD-54PE only) Connect the pump drain pipe (5m or 16.4ft) on the back of the unit, and then the unit can continuous run without emptying the bucket. 1} Put the ult on level floor and unscrew the cap on the drainage hole; 2) Install the pump connector and gasket; 3) Install the drain pipe on connector; 4) Press "POWER" button ta run the unit and press the “PUMP” button to start the pump drain function The “PUMP” indicator lights up. 5) The max.
AUTOMATIC DEFROST When frost builds up on the evaporator coils, the compressor will stop and the fan will continue to run until the frost disappears. When the coils are completely defrosted, the compressor will automatically restart and dehumidifying function will resume. LOCATION REQUIREMENTS The unit operating in a room will have little or no effect on dehumidifying any adjacent enclosed space, such as a closet, unless there Is adequate alr circulation In and out of the enclosed space. 1.
CLEAN THE DEHUMIDIFIER Clean the appliance with a slightly damp cloth then dry with a dry cloth. + Never splash water on the appliance. It may cause electric shock or damage to the appliance. + Never use patrol, alcohol or solvents to clean the appliances. » Never spray insecticide or similar chemicals on the appliance. CLEAN THE FILTER To keep your appliance working efficiently, you should clean the filter every week of operation. The filter can be removed like the illustration to the right.
TROUBLESHOOTING Occasionally, you may encounter mass problems that are of a minor nature and a service call may not be necessary. Use this troubleshooting guide te identify possible problems you may be experiencing Problem Possible Causes Solutions Dehumidifier does not start The dehumidifiers unplugged. Make sure the dehumidifiers plug is pushed completely into the outlet. The fuss Is blown or cultural breaker is tripped. Check the house fuse/circuit breaker box and replace fuse or reset breaker.
TROUBLE SHOOTING Problem Possible Causes Solutions For drier air, press the \/ The Humidity Control may | button to lower the humidity not be set low enough setting or set the dehumidifier to {J for continuous made. Doors and windows may not Check that all doors, windows, be closed tightly and other openings are Dehumidifier does securely closed. not dry the air as it should Clothes dryer may be py. door away blowing molts alr Into the : room The dryer should be vented outside.
ERROR CODES If the following error code appears, please check the causes and solution. CODE | DESCRIPTION POSSIBLE CAUSES SOLUTIONS EH | Humidity sensor failure | Humidity sensor is damaged. Contact customer mania E1 Temperature sensor | Temperature sensors Connect customer E2 failure damaged. service center. E3 Refrigerant leakage or | Ambient temperature is Move the appliance to high ambient too high. cooler place. temperature E3 appears Marty dimes.
Ser Your Guarantee If this product is found to be faulty as a result of faulty materials or workmanship within one year from date of purchase, it will be repaired free of charge. This guarantees is subject to the following terms: © Supervention must be notified of the fault. « Proof of purchase must be presented to Allentown's nominated representative. « The warranty will be cold If the product Is modified, misused or repaired by an unauthorized person.