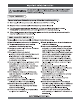
WARNING Fortunately oleander follow the Information [0 hls menial o minimize diphtheria ol fre implosion electroshock and bo help prevent proper Ha made o proportional injury. Plazas install your dishwasher properly, follow the internationalist guide, B Water supply inlet temperature should bs between 120°F and 149TH. # Dispose of the discarded appliance and packing material properly. B The dishwasher must be properly grounded, or it can resulting a risk of electric shock.
o el g Specification ) Rapacity 14 place settings Dimension 2389x256x33.
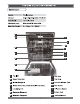
Features ) Filter System Your dishwasher has a multiple Filter System. In the System there are four filter-meshes. it can separate soiled water and clean water in different chambers. The multiple filter system helps your dishwasher {o get better performance with less water and less synergy. Smart Wash System Your dishwasher has Smart Wash System. When a partial load of lightly sliced dishes is placed in the unit, 8 wash cycle similar o a short wash will automatically be performed.
How your dishwasher cleans ) Gatling Started D Your dishwasher cleans by spraying a mixture of hot water and detergent through the spray arms against dolled surfaces. The dishwasher fills with water covering the filer area. Water is then pumped through the multiple filter and spray mams. Separated sol particles go down the drain as the water is pumped out and replaced with clean water. The number of warts fills will vary with the cycle being used. 1.Load dishwasher (See preparing and loading dishes}. 2.
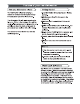
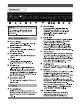
Control panel NOTE This model is built-in modals, all the buttons can only be operated in the open state, Heavy Wash This cycle is for hard-to-clean, heavily soiled dishes, pots and dishes. B Normal wash This cycle is for regularly soiled dinner dishes or silverware. B Delicate Wash This cycle is for lightly sliced china and crystal, B Quick wash This eyes is for lightly soiled and per-rinsed dishes and silverware. B Rinse only This cycle is for per-rinsing dishes or glasses.
Start/Cancel ~Open the door, select a wash cycle you desired, the indicator light will fum on. Press the Start/Cancel! button and close the door within 4 seconds, then the selected program light begins (o blink and the medley progress indicator in control panel will light on, the washing cycle is running. -If you close the door more than seconds after pressed the Starchiness! button, the cycle will pause and not run.
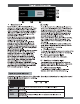
Recuperating dishwasher if the Delay Start option is selected, the number of delay start hours shows in the Status Window. After the machine works, the remaining teems of the cycle that have been selected will be showed in the Status Window. NOTE The remaining time could suddenly increase or drop several minutes. This means the Smart Sensor has checked the soil level and adjusted for the appropriate water level.
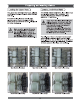
Preparing and loading dishes Adjustable Upper Rack ) The upper rack height can be easily adjusted o accommodate loading taller dishes in either rack. To accommodate taller dishes in the bottom rack, there are 2 positions available: 1. Lift the rack upper position The upper rack in the lower position i Upper rack Lower rack Dish Preparation ) Scrape away large pieces of food, bones, pits, toothpicks, etc. The continuous filtered wash system will remove the remaining food particles.
Preparing and loading dishes Loading the Upper Rack ) The upper rack is designed for cups, glasses, small plates, bowls and plastic rems marked safe efc. For best results, place the bowls, cups, glasses, sauce pans with dolled surface facing down or toward the center. Tilt slightly for tether drainage. Upper Rick § place seeings Loading the Bottom Rack ) The bottom rack is designed to load plates, soup bowls, plates, saucers and cookware.
Adjusting the top rack This dishwasher has a convenient fop rack for silverware, scullery, and small items. This rec can be adjusted to accommodate varying loads, as gown below. Candlelit eidsalgoed Lt rack st I st and it rec maid o the ot Lt rack adjusted t sower position and right rack removed.
Preparing and loading dishes Loading the Silverware Basket ) Adding A Dish ) The silverware basket could be divided into thees separate modules that can be used in both upper and lower racks. 1. Spoons 2. Knives 3. Salad forks 4. Forks 5. Large spoons 8. Large forks WARNING Do not let any item extend through bottom. He sure nothing protrudes though bottom of the basket or rack o block the lower spray amn To add or remove items after wash cycle starts: 1.
Preparing and coaling dishes Filling the rinse aid dispenser 1. Open the door, furn the dispenser cap to 3. You can adjust the amount of the rinse aid left and ift it cut. released during the rinse operation, the greater number indicates the larger amount of rinse aid released. violent 2. Add tinge aid until the indicator point to max. Filling the detergent dispenser ) 1.Push the dispenser cover larch downwards 2. Add the detergent fo the main wash and open it. compartment.
B el Cleaning the exterior door and pans 3 1. Stainless steel panel 2.Control panel Clean the stainless cites! door and handle Clean the control pans! with a lightly dampened re%ulzlarltslf_‘ to remove the debris with cleaning cloth, clean it gently. soft cloth. Do not use appliance wax, polish, bleach or products containing chlorine fo clean the stainless steel door.
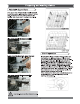
B e Clean the Fine Filler Take out the Cylinder Filter and remove the Fine Filter from the dishwasher tub bottom. To remove the Fine Filler you must first remove the bottom spray arm as shown below. Flush the Fine Filter by holding i under running water and replace.
B e Clean the door gasket ) Air gap 3 Clean the door gasket with a damp cloth to remove food particles regularly. Inside ) The inside of the dishwasher is serif-cleaning with normal use. If needed, clean the tub gasket with a damp cloth and use a brush similar to the ones shown below to clean the opening in the end of the gasket. If there is an air gap installed with your dishwasher, make sure it is clean so the dishwasher will drain properly. Air gap is not part of your dishwasher.
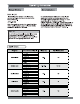
e Before calling§ for service ) Dishwasher won't start Dishwasher beeps at the and of the cycle Rinse Aid light on Dishwasher operates too long Dishes are not clean enough Dishes not drying sough Spots and filming on dishes Etching Detergent left in dispenser cup
e 0 Detergent dispenser will not shut Water remains in the dishwasher Dishwasher does not drain properly Suds in the b Dishwasher leaks Black or gray marks on dishes Stained tub interior Noises Dishwasher won't fil When moss malfunctions come on, the appliance will display error codes to wam you: Codas Meanings Possible Causes . : Faucets ia not opened, or water intake is Ef Longer inlet time. restricted, or water pressure is too low. E4 Caravaggio. Some element of dishwasher leases.
INSTALLATION INSTRUCTIONS Read the installation instructions clearly, and further more, pay attention to the following lists: 1. The power-supply receptacle for the appliance shall be installed in a cabinet or on a wall adjacent to the under counter space in which the appliance is to be installed. 2. There shall be an opening through the partition between the compartments specified in {a) that is large enough for the attachment plug to pass through.
ST Your Guarantee If this product is found to be faulty as a result of faulty materials or workmanship within one year from date of purchase, it will be repaired free of charge. This guarantee is subject to the following terms: Supervention must be notified of the fault. Proof of purchase must be presented to Allentown's nominated representative. The warranty will be void if the product is modified, misused or repaired by an unauthorized person.