DEHUMIDIFIER with BUILT-IN PUMP MODELS: SD-52PE / SD-72PE INSTRUCTION MANUAL Please read these instructions thoroughly and keep it in a safe place for future reference.
CONTENTS SAFETY PRECAUTUIONS…...……………………………………………………………2 ELECTRICAL INFORMATION .……………………………………………………………3 CONTROL PANEL ….………………………………………………………………………4 FEATURES ………….……………………………………………………………………….5 IDENTIFICATION OF PARTS …………………………….……………………………….6 OPERATING THE UNIT ………..………………………….……………………………….7 WATER DRAINAGE ……….………..…………………………………………………….8 CARE AND MAINTENANCE ………..………………………………………………….10 TECHNICAL SPECIFICATIONS ……………………….………………………………11 TROUBLE SHOOTING …………………………………………………………………..
BEFORE YOU USE YOUR DEHUMIDIFIER, PLEASE READ THIS INSTRUCTION MANUAL CAREFULLY. SAFETY PRECAUTIONS To prevent injury and property damage, the following instructions must be followed. Incorrect operation due to ignoring of instructions may cause harm or damages. The seriousness is classified by the following indications: WARNING: This symbol indicates the possibility of death or serious injury. CAUTION: This symbol indicates the possibility of injury or damage to property.
------------------------------------------ CAUTION --------------------------------------------------- 1. Do not use the unit in small spaces for lack of air ventilation. 2. Place the unit on a level, sturdy ground. 3. Do not cover the units and its air inlets/outlets. 4. Care should be taken when using the unit in a room with the following: infants, children, elderly people, and people not sensitive to humidity. 5. Never insert your finger or other foreign objects into grills or openings.
CONTROL PANEL Control Buttons: whenever a button is pressed, the unit will make a beep sound to indicate that it is changing modes. PUMP: Press to activate pump operation. NOTE: Make sure the pump drain hose is installed and the continuous drain hose is removed before activating the pump operation. When the bucket is full, the pump will begin to work. Refer to the following pages for removal of collected water. Do not use this operation when outdoor temperature is 32°F or lower .
DISPLAY PANEL • Displays the set humidity level (from 35% to 85%) or auto-start/stop time (0-24) while setting, then returns to display actual room humidity level (±5% accuracy), in a range of 30% RH to 90%RH (relative humidity). • Displays error codes and protection codes: o AS – Humidity sensor error. Unplug and plug back in. If error repeats, call for service. o ES – Temperature sensor error. Unplug and plug back in. If error repeats, call for service. o P2 – Bucket is full.
o When the unit if off: press of the Timer button and the Timer-On indicator will illuminate (indicating auto-start is initiated). Press Timer button again and the Timer-Off indicator will illuminate (indicating auto-stop is initiated). o Press or hold the +/- buttons to change the set time in 0.5-hour increments, up to 10 hours; then in 1-hour increments, up to 24 hours. o The selected time will register after 5 seconds and the panel will revert back to displaying ambient humidity.
OPERATING THE UNIT Positioning the unit A dehumidifier will have little or no effect in drying an adjacent enclosed area, such as a closet, unless there is adequate circulation of air in and out of the area. • Do not use outdoors. • This dehumidifier is intended for indoor residential applications only. This dehumidifier should not be used for commercial or industrial applications. • Place the dehumidifier on a smooth, level floor strong enough to support the unit with a full bucket of water.
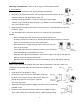
Removing collected water - There are three ways to remove collected water. 1. Use the bucket If the unit is off and bucket is full, the Full indicator will illuminate. If the unit is on and bucket becomes full, the compressor and fan will turn off. Full Fig.1 indicator illuminates and digital display shows P2. Hold the left and right handles securely and slowly pull bucket straight outwards. (Fig.1) Do not put down the bucket - the bottom is uneven and will tip Fig.
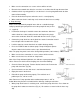
Make sure the connections are secure so there will be no leaks. Direct the hose towards the drain, be sure there are no kinks that will stop the water flow. Continuous drain is gravity-pulled, be sure the hose is level or going downwards to allow water to flow smoothly. Place the bucket back in place and make sure it is seated properly. When continuous drain is not being used, remove the drain hose assembly. 3.
CARE AND MAINTENANCE Always turn the dehumidifier off and unplug from power source before cleaning. Clean the Grille and Housing • Use water and a mild detergent. Do not use bleach or abrasives • Do not splash water directly onto the unit. Doing so may cause electric shock, cause the insulation to deteriorate or cause the unit to rust. • The air intake and outlet grilles get dirty easily, use a vacuum attachment or brush to clean.
TECHNICAL SPECIFICATIONS MODEL Moisture Removal ** Application Area SD-52PE SD-72PE 50 pints per day 70 pints per day 350 sq. ft. 550 sq. ft. Power Supply 1Ph, 115V / 60Hz Current 4.7A 6.9A Power Consumption 520W 720W Energy Factor (EEV) 1.85 L/kWh Starting Current 22A 33A Working Environment 41 ~ 95°F 35% to 85% RH Water Tank Capacity 7L Air Flow (High//Low) 320/280 m3/h Noise Level (High) 58.5 dB(A) Dimension 15.39(W) x 10.98(D) x 23.23(H) in. Packaging 16.61 x 12.68 x 24.
Your Guarantee If this product is found to be faulty as a result of faulty materials or workmanship within one year from date of purchase, it will be repaired free of charge. This guarantee is subject to the following terms: • Sunpentown must be notified of the fault. • Proof of purchase must be presented to Sunpentown’s nominated representative. • The warranty will be void if the product if modified, misused or repaired by an unauthorized person.