
Use and Care Manual


6
o When the unit if off: press of the Timer button and the Timer-On indicator will illuminate
(indicating auto-start is initiated). Press Timer button again and the Timer-Off indicator
will illuminate (indicating auto-stop is initiated).
o Press or hold the +/- buttons to change the set time in 0.5-hour increments, up to 10
hours; then in 1-hour increments, up to 24 hours.
o The selected time will register after 5 seconds and the panel will revert back to
displaying ambient humidity.
o When both auto-start and auto-stop times are set, both Timer On and Off indicator lights
are illuminated, identifying both On and Off timers are now programmed.
o Turning the unit ON or OFF at any time or adjusting the timer setting to 0.0 will cancel
any timer programs.
o Timer program is also cancelled when LED displays P2 error code.
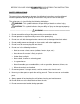
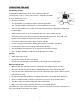
IDENTIFICATION OF PARTS
FRONT
1. Control panel
2. Air intake grille
3. Air outlet grille
4. Air filter (behind the grille)
5. Water bucket
6. Handle (both sides)
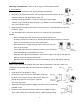
REAR
1. Continuous drain hose outlet
2. Caster
3. Power cord and plug
4. Band (for use when storing the unit)
5. Pump drain hose outlet
ACCESSORIES
Note: all pictures in this manual are for explanation purposes only. The actual product may differ slightly, but the
operations and functions are the same.