
Installation Guide


Installation Instructions
7
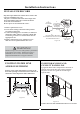
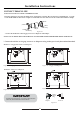
CONNECT WATER SUPPLY
Hot Water
Supply Line
Fill Hose
Water Valve
Bracket
Elbow90¡
Thread Seal Tape
Figure 21
IMPORTANT– Check to be sure that dishwasher does not rub or
contact the fill hose or water supply line. Test by opening and
closing the door. Re-route the lines if a rubbing noise or
interference occurs.
* Wrap 90º elbow with tread seal tape.
* Wrap 90º elbow onto the water valve.
* Do not over tighten the 90º elbow, water valve bracket could
bend or water valve fitting could break.
* Position the end of the elbow to face the left.
* Connect water supply line to 90º elbow.
If water supply line could not be connected to 90º elbow directly,
slide ferrule against elbow and secure with compression nut.
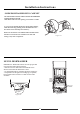
The dishwasher must be secured to the countertop or
the cabinet sides. When countertops are made of wood
use Method 1. When countertops are granite or other
materials that will not accept screws, use Method 2 to
secure at the sides.
Method 1: Secure dishwasher to wood countertop
Position dishwasher so that the door lines up with the
front face of adjacent cabinets.
Fasten the dishwasher to the underside of the countertop
with the 2 Phillips special head screws provided.
3/4"
Brackets
Wood Countertop
POSITION DISHWASHER, SECURE TO CABINET
When step is complete (either method), close dishwasher
door and verify that gap between countertop and top of
dishwasher door is at least 1/2”.
IMPORTANT:
Check to be sure the dishwasher is centered in the
opening and there is no interference with adjacent
cabinets when opening or closing the door
Drive screws straight and flush. Protruding screw heads
will scratch the top or sides of the control panel and can
interfere with door closing.
Figure 18
Figure 19
Brackets
Method 2: Secure dishwasher with side-mounting brackets
Position dishwasher so that the door lines up with the
front face of adjacent cabinets.
Remove plug buttons (one on each side)
Install screws through the dishwasher side mount bracket
and into the adjacent cabinet on each side. Reinstall plug
buttons.
Figure 20