INSTALLATION INSTRUCTIONS SAFETY INSTRUCTIONS Throughout this manual, you'll see Warning and Caution notes. These warnings, cautions, and the important safety instructions that follow do not cover all possible conditions and situations that may occur. it's your responsibility to use common sense, caution, and care when installing, maintaining, and operating the dishwasher.
GROUNDING INSTRUCTIONS For a permanently connected appliance: This appliance must be connected to grounded metal, a permanent wiring system, or an equipment-grounding conductor must be run with the circuit conductors and connected to the equipment-grounding terminal or lead on the appliance. The dishwasher is very heavy. Do not attempt to move or carry a dishwasher alone. Twa or more people are needed to move a dishwasher and avoid potential injuries.
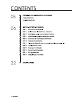
CONTENTS constants 60-0 66 a PREPARING THE DISHWASHER ENCLOSURE Product dimensions Enclosure dimensions INSTALLING THE DISHWASHER STEP 1 STEP 2 STEP 3 STEP 4 STET 5 STEP & STEP 7 STEP 8 STEP @ STEP 10 STEP 11 STEP 12 Check the parts and tools Select the best location for the dishwasher Check water supply requirements and cautions Check the electrical requirements and cautions Unpacking and inspecting the dishwasher Preparing the dishwasher Placing the dishwasher and connecting the cold water supply line Lev
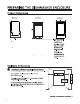
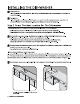
PREPARING THE DISHWASHER ENCLOSURE Product Dimensions Rear view Front view Back view 17.7" 325° The water supply ling, power cable and drain hose should go through this space behind the dishwasher. Then, the power cable ruin channels under the dishwasher to connections in the Front Enclosure Dimensions This dishwasher is designed io be enclosed on the top and ~~ on both sides by a standard residential kitchen cabinet unit +7 {30mm} mim The installation enclosure must be clean and free * of any obstructions.
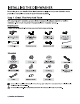
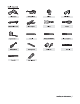
INSTALLING THE DISHWASHER Be sure that you or your installer follow these instructions closely so that the new dishwasher works properly and that you're not at risk of injury when washing dishes. Step 1 Check The Parts And Tools Before starting on the installation, prepare all the necessary tools and parts required to install the dishwasher. This will save installation time and simplify the installation process. Parts Required Provided with the dishwasher.
Tom 34 Safety glaces Wire stripper Pencil Hex L wrench Z Gloves Phillips screwdriver OP Hole saw Flashlight Nipper Flat screwdriver installing the dishwasher 7
INSTALLING THE DISHWASHER New installation If the dishwasher is a new installation, most of the installation work must be done before the dishwasher is moved into place Replacement if the dishwasher is replacing an old dishwasher, you must check the existing dishwasher connections for compatibility with the new dishwasher. Re pace the existing connections as necessary.
STEP 3 CHECK WATER SUPPLY REQUIREMENTS AND CAUTIONS The water supply line pressures must be between PSI The dishwasher must be connected to a cold water supply. Do not connect to a hot water supply.
INSTALLING THE DISHWASHER Step 4 Check The Electrical Requirements And Cautions The electrical requirements for the dishwasher are as follows: + In the United States, install in accordance with the National Electric Code/State and Municipal codes and/or local codes. « in Canada, install in accordance with the Canadian Electric Code 22.
Step 5 Unpacking And Inspecting The Dishwasher Unbox the dishwasher in an open area free of obstruction both around the carton and overhead. We recommend that you retain the carton and all of the packing materials until the dishwasher is fully installed and operational to ensure you have removed all the product's components from the carton prior to disposal. Unboxing 1. Unbuckle or cut the four straps securing the carton top. 2.
INSTALLING THE DISHWASHER Plumbing Electrical 1. Check the void water connection on the front left-side of the base of the dishwasher. The mounting plate should be secured to the front of the base, the threads inside the connection should be smooth and shiny, and the area should be cognizant and free of any debris. 2. Check the plastic Brake and Sensor cases to ensure these assemblies are not cracked and that all connections are secure. 3.
Step 6 Preparing The Dishwasher 1. Ensure that the circuit breaker and water supply valve are turned off before proceeding with the following steps. A Before you move or lay down the dishwasher for installation, make sure to adjust the height of the legs so the “im lags are as short as possible. This prevents the legs from breaking. Level the dishwasher by adjusting the height of the legs after you have the dishwasher in place 2.
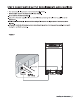
INSTALLING THE DISHWASHER Step 7 placing The Dishwasher And Connecting The Cold Water Supply Line 1. Adjust the three leveling legs at the bottom of the dishwasher after measuring the height of the cabinet opening from under the counter top to the floor. {See Step 8, Leveling the Dishwasher} 2. Locate the cold water supply line and the power cable 3. Place the dishwasher so that the power cable is in the right channel of the base of the dishwasher.
Step 8 Leveling The Dishwasher 1. Open the door and place the level against the top of the tub on the inside and check if the the dishwasher is level If it is not level, rotate the leveling legs at the bottom front of the dishwasher until the dishwasher is level See the first note below for instructions on dusting the height of the front legs. 2. Use the level to check if the dishwasher is level front to back, as shown in the figure to the right.
INSTALLING THE DISHWASHER Step 9 Securing The Dishwasher You must fix the dishwasher to the counter top or cabinet side walls for additional stability and safety. 1. if the counter top is made of wood or the material will not be damaged by drilling, follow the instructions in 2-1 below. If the counter top is made of granite, marble, or any other material that can be damaged by drilling, follow the Instructions in 2-2 below. 2. .
Case 1.
INSTALLING THE DISHWASHER Case 2. With disposal With disposal Hose clamp Ny e==s 3. Hack the size of the sink's drain hose connector{0 83 inches. as shown in Figure 11 below). ff the end of the drain has does not fit onto the drain hose connector of the sink, use an adapter purchasable at a plumbing/hardware Supply stare. 4. Side a hose clamp over the end of the drain hose.
’~ Front of dishwasher NOTE: The top of the drain hose must be less than 39.37 inches Drain hose MAX 38.37 Ines The drain hose internal diameter is 0.83 inches “. Secure the drain hose to the sink wall using cable ties or other fastening materials Otherwise, the drain hose may bend at the end. causing a drainage problem or excessive supply of water, Counter TOP $1.
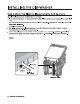
INSTALLING THE DISHWASHER Step 11 Wiring Connections 1. Before connecting the power cable to the dishwasher, make sure the circuit breaker is off. 2. In the junction box located at the front bottom right of the dishwasher, find the three power wires from the dishwasher including the grounding line 3. Pass the power cable through the strain relief, and then into the junction box (Figure 14} 4.
Step 12 Completing The Installation 1. Open the door and remove alt foam, paper packaging, and unnecessary parts. 2. Turn on the circuit breaker you turned off before you began the installation. 3. Open the water supply valve to supply water to the dishwasher 4. Tum on the dishwasher, and then select and run a cycle. Check if the power turns on correctly and if there is any water leakage while the dishwasher is operating.
SPECIFICATIONS Power supply 120V 80Hz Water pressure 5.8 145 PSi Dil i CAE x Dat height | 1772 inches x 22.83 inches x 32.48 inches Specifications are subject to change without notice for quality improvement purposes The actual appearance of the dishwasher may differ from the illustrations in this manual.