WA-1223S: 12,000 BTU
INTRODUCTION IMPORTANT SAFETY INSTRUCTION ...........................................................................1 ELECTRICAL REQUIREMENTS ................................................................................... 2 PACKING LIST ............................................................................................................3 INSTALLATION & ASSEMBLY INSTRUCTIONS ............................................................. 4 USING YOUR AIR CONDITIONER ................................
1
0-12 amps 15-amp 2
3
FIG.
3 FIG. 3 FIG. 4 FIG.
FIG. 10 (Suggest to keep a downward oblique, to let accumulated rain water to drain out, from back side of the unit bottom.) FIG. 6 FIG. 11 FIG. 7 FIG. 12 FIG. 8 FIG. 13 FIG.
FIG.
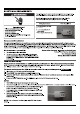
Cool Mode: The cooling function allows the air conditioner to cool the room and at the same time reduces Air humidity. Press the MODE button to activate the cooling function. To optimize the function of the air conditioner, adjust the temperature and the speed by pressing the button indicated. Dry Mode: This function reduces the humidity of the air to make the room more comfortable. Press MODE button to set the DRY mode. An automatic function of alternating cooling cycles and air fan is activated.
10. Directional Louvers: To direct the airflow, 6. Eco Button: When the unit is in ECO mode, the horizontal wheel to control the horizontal direction, light will turn on. In ECO mode, the unit will air deflector to control the vertical direction. turn-off once the room is cooled to the user set temperature. The fan will also be off at this point. The unit will turn back on when the room temperature rises above the user set temperature.
1 5. Timer: Use these buttons on the control panel or remote to set the timer. Timer Off: The timed stop is programmed by pressing the TIMER button. Set the rest time by pressing the button with arrow up or down until the rest time displayed is to your demand then press TIMER button again. Timer On: When the unit is off, press TIMER button once, set the temperature with pressing the button up or down. Press TIMER button a second time, set the rest time with pressing the button up or down.
15 FIG.
12
If this product is defective or not working properly Please DO NOT return to your retail store Please contact us directly with any Service or Technical Assistance Contact us toll free at: 1-800-330-0388 13
Your Guarantee If this product is found to be faulty as a result of faulty materials or workmanship within one year from date of purchase, it will be repaired free of charge. This guarantee is subject to the following terms: · Sunpentown must be notified of the fault. · Proof of purchase must be presented to Sunpentown's nominated representative. · The warranty will be void if the product is modified, misused or repaired by an unauthorized person.