
User Guide
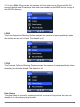


To return to the rst frame and the options of deleting, playing or protecting the le,
press the Menu button. Press the Menu button again to return to the screen of nine
thumbnails.
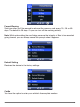
Thumbnails not designated by a lmstrip icon are still photos. Selecting one will
display the image full screen. In the upper-right corner are the lename (containing
the date and time the picture was taken) and the image resolution (such as 2560 x
1440). Pressing the Rec button will bring up the “Erase This?” prompt. Pressing the
Mic button will toggle the Protect le function. The Menu button will return you to the
thumbnails screen.
Note: You can simultaneously play videos or photos on an external screen by
connecting an optional cable to the camera’s AV output.
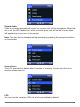
Transferring Videos and Photos to a PC
You can connect the camera to your computer with the long USB cable normally
used to receive power from the vehicle. However, you may nd it more convenient
to use an optional mini-USB to USB cable. In either case, make sure the cable is
plugged into the USB port on the camera itself rather than the USB port on the
optional GPS module. The words “Mass Storage” will appear against a blue screen
on the camera display.
As an alternative to using a cable, you can readily move the microSD card from the
camera to a microSD card adapter that plugs into an SD slot if there’s one on your
computer or into a card reader that plugs into a USB port on your computer.
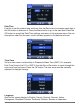
Whether the memory card is still in the camera or not, the computer will identify it
as a removable disk drive. Clicking on it will bring up the DCIM folder. It contains
the Movie and Photo subdirectories. The Movie folder will be further divided into
unprotected loop recording videos and RO (Read Only) emergency recording les.
You can play les directly from the card, copy them to your computer or delete them.
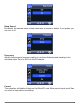
64GB microSD Card Support
If a 64GB card is not recognized by the A119, you’ll need to properly format it. If the
card has not been used before, formatting it won’t wipe out any data. But if the card
has been in use, keep in mind that any data stored on the card will be lost during
formatting.
Fully insert the 64GB microSD card into the camera’s memory slot until a click is
heard and connect the camera to your PC using the included USB cable.
SPYTEC A119 DASH CAMERA USER GUIDE 21