
User Manual


What’s in The Box
Camcorder (also called the DVR)
5V wall outlet adapter
USB 2.0 cable
User manual
Requirements
A microSD card with up to 200GB of memory
A Windows or Macintosh computer with USB port, media player software and
Internet access to download the camera’s control software.
GETTING STARTED
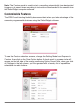
Quick Start
Here’s the fastest way to start video recording right out of the box. Since the battery
is unlikely to be charged, connect the USB cable to the camera and AC adapter and
plug the adapter into a power outlet. Insert a microSD memory card with a capacity
of 32GB or less. Keep in mind that the camera’s date/time stamp will not be accurate
since it would need to be rst adjusted from the computer software. Peel off the
protective plastic covering the lens and sensors on front of the camera. Move the
three-position switch to the middle position, Triggering mode, indicated by the run-
ning man icon. Hold down the power button until the LED turns green. When you see
the green LED continually ashing, the camera is recording. Make sure to remove the
protective plastic tab on the camera lens and point the lens toward the subject.
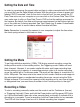
Charging the Battery
The fastest way to charge the ZIR32 is by plugging the AC adapter into a wall outlet
or power strip while the other end of the cable is connected to the USB port on the
right side of the camera (with the lens facing you). If this is the product’s rst use or
the battery hasn’t been refreshed in several months, gure on a charging time of 8
hours (when not recording) or until the orange LED turns green. When you remove
the camera from the USB power cable, the LED will shut off. Charging the camera
from a computer’s USB port will take longer. Recharging the camera regularly
shouldn’t take more than a few hours depending on how much the battery has been
depleted.
SPYTEC ZIR32 720P NIGHT VISION INTELLIGENT SECURITY CAMERA USER GUIDE 2