
Use and Care Manual


10
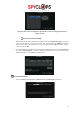
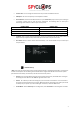
3.5.1 PPPOE setup:
Note: PPPoE is for use with dial-up and DSL connection
• PPPoE function: select “√” to enable and start using PPPoE dial-up
• PPPoE user: Input the user name of your ISP (Internet Service Provider) into edit box
• PPPoE password: input the password of your ISP into edit box
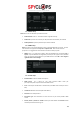
3.5.2 DDNS setup:
Note: This option is for remote DVR access using a customized URL that you choose. The two
main sites that are supported are noip.com and dyndns.com. Each one has their own
pros/cons so it is suggested to research both to find the one that you prefer
• DDNS: Click “√” in check box to enable. Select the dropdown box and choose noip or
dyndns. Input the URL that was assigned to you when you set up your account, and then
enter the username and password for your DDNS account. Click “OK”. Don’t forget to
right click twice to save changes.
3.5.3 E-mail setup:
• E-Mail Function: Select to enable email options
• SMTP Server: Do a search for your email provider’s SMTP server (ex:
plus.smtp.mail.yahoo.com) and enter the full address here
• Port: Enter the port number that is returned from your SMTP server search (ex. Yahoo =
465)
• Username: Your email username (full email address)
• Password: Your email password
• Encryption Type: This information can also be found in your email providers SMTP
search
• Sender, sendee 1, sendee 2: “Sender” will be your email address and “Sendee” will be
the email you want the email to go to