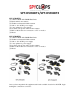
SPY-DVR4KIT1/SPY-DVR4KIT2 SPY-DVR4KIT1 (1) 4 channel DVR with 500GB Hard Drive (2) Plastic mini dome cameras (2) Weather resistant mini bullet cameras (1) 120v to 12v AC/DC power supply (1) 5 way splitter for power supply (4) 18 meter video/power cables for the cameras (1) BNC to RCA cable for connection to a TV or monitor (1) Mouse SPY-DVR4KIT2 (1) 4 channel DVR with 500GB Hard Drive (4) Weather resistant mini bullet cameras (1) 120v to 12v AC/DC power supply (1) 5 way splitter for power supply (4) 18 mete
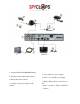
1. 4 channel DVR with 500GB Hard Drive 5. 5-way splitter for power supply 2. Weather resistant mini bullet cameras 6. 120v to 12v AC/DC power supply 3. Plastic mini dome cameras 4. 18 meter video/power cables for the cameras 7. BNC to RCA cable for connection to a TV (VGA to a monitor—VGA not included) 8.
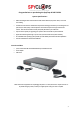
Congratulations on purchasing the SpyClops H.264 DVR Kit System Specifications: • Multi-camera digital video recorder which includes motion detection, key buzzer alarm, e-mail and area masking • The DVR uses state of the art H.264 video compression technology to maximize your recording time and optimize your video quality. H.264 compression saves hard drive space and supports faster data transfer.
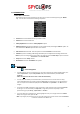
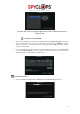
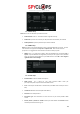
1.0 INTRODUCTION 1.1 Main Menu Introduction Right click the mouse and you will find the main menu (it can also be accessed by pressing the “MENU” key). The main menu consists of the following components: • X1 view Click to view which channel you want to view • X4 view Click to view 4 channels • Video playback Shortcut to the “video playback” option • Manual record Set manual recording for one or all channels by choosing the “All on” option.
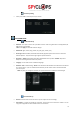
*Note: Click “OK” to save any changes then right click twice to save your configurations after every change you make 2.2 Format the Hard Drive (HDD) • Before turning ON the DVR, confirm the DVR is plugged in with the provided power supply. Connect the mouse using the USB port in the back of the DVR. After switching power, the POWER light might be flashing, this is normal. The system will then show a warning to format the HDD (hard drive).
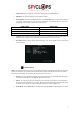
2.4 Factory setting • Factory reset “all” or each setup choice you choose 3.0 SYSTEM SETUP 3.1 General Set-up • Date time: This option is used to set up the date and time. If the wrong information is left populated, the DVR will not record properly *Note: click “Apply” to save date and time changes • Date format: [year, month, day], [month, day, year], [day, month, year] • Auto Logout: When enabled, the DVR will automatically logoff the present user if there is 10 minutes without operation.
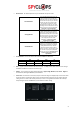
• Camera Title: You can change each camera name as you select each different channel • OSD Alpha: The menu transparency can be adjusted as needed • VGA resolution: Choose the best VGA resolution for your monitor size, keep in mind if you are viewing on a computer or laptop, will you have the screen maximized? The following chart can assist you in determining which resolution is best for your monitor/screen RESOLUTION 800 x 600 1024 x 768 1280 x 1024 1920 x 1080p 50Hz/60Hz SCREEN SIZE 780 x 430 1000 x
• Bitrate mode: This will be dependant on your bandwidth and specific needs This is the default encoding mode, and also the most basic. In this mode, the bitrate will be the same for the whole file. It means that each part of your video file will be using the same number of bits. The complex parts will be of a lower quality than the easiest ones. The main advantage is that the final files size won't change and can be accurately predicted.
3.4 Record Setup: Use your mouse and click the right button to select “Setup” key, select “System setup”, and select “Record Setup” • Channel: Pick the camera view you want to record • Weekday: Choose the day you would like to set up, or you can choose “Everyday” if you want everyday to be recorded at the same times/settings. • Modes: “Manual” is when you have manually specified the recording, and it is in blue.
3.5.1 PPPOE setup: Note: PPPoE is for use with dial-up and DSL connection • PPPoE function: select “√” to enable and start using PPPoE dial-up • PPPoE user: Input the user name of your ISP (Internet Service Provider) into edit box • PPPoE password: input the password of your ISP into edit box 3.5.2 DDNS setup: Note: This option is for remote DVR access using a customized URL that you choose. The two main sites that are supported are noip.com and dyndns.com.
• Subject: What you want your emails subject line to be • Interval: Select this option if you want an automatic email sent periodically with screenshots in seconds *Note: there are 3600 seconds in an hour • Click “Test” to test your email settings 3.6 Video detection: Select “Setup”, select “System setup”, select “Video detection” • Channel: Choose which camera view you want to set up detection on • Sensitivity: Choose the right trigger video detection sensitivity.
3.7 PTZ Setup: *Note: To control the PTZ, You must connect the wires to the RS-45 port on the back of the DVR • Channel: Choose which camera view you want to work with • Protocol: Choose the “protocol” required for your device. Both protocols require an additional RS-485 data cable • Device ID: Assign an ID number to each channel (camera view) • Baud rate: We suggest using a “baud rate” no higher than 9600 to avoid errors.
4.0 VIDEO INFORMATION 4.1 Video Playback: Right click and select “Video Playback”, or go to “setup”, and then “video playback” • Channel: Either choose the channel you want to view, or you can select all channels to view everything that has been recorded and hit “search” • Record mode: choose the record mode by clicking the check box • Search time: input the starting and finishing time into edit box • Search: click “Search” to begin the corresponding video file searching and show the files.
• Search time: Enter the time in which you would like to pull up and hit “search" • After choosing the needed file from the list box, click “Backup” to backup the record or “Cancel” for no backup. To backup the recording click “YES” 5.0 SYSTEM 5.1 System info: • HDD info: This shows the model, capacity, amount of data used and status (formatted or unformatted) of all HDD that are installed.
6.0 SMARTPHONE ACCESS 5.1 EseeNet+ app: • I-Phone/I-Pad: For I-Phone or I-Pad users use this link to install Esee Net+ https://itunes.apple.com/sr/app/eseenet+/id789619158?mt=8 • Android: For Android users, use this link to install Esee Net+ https://play.google.com/store/apps/details?id=com.ESeyeM • To add a device, select the + next to My Device. • Choose IP address or Eseenet ID for Add Model. For IP address log in, enter the IP address of the DVR or your DDNS URL if one has been set up.
6.0 TECHNICAL INFORMATION 6.1 Technical Parameters Model Hard Drive Operation system Operation interface Video standard Image compression Audio compression Recoding mode Video Search Backup Video input Video output Audio input Audio output Recording quality 4 channel DVR 1 SATA, 500GB included (Expandable to 2TB) Embedded Linux operation system Graphical user interface (GUI), mouse, front panel NTSC and PAL H.