Hole Locator HL-100 USA Operating instructions
USA Operating manual: Should you have additional questions concerning this product’ s operation and use or care and maintance, please call our Customer Service number: 1.800.869.7460 U.S. and Canada 1. Main applications: The HL 100 hole locator is an easy-to-use point laser for aligning a series of holes in a straight line. The laser beam serves as a precise horizontal (level), incline /decline (slope) or vertical (plumb) reference point with a range up to 25m /75 ft.
2.
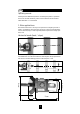
3. Method of operation: 3.1. Installation in joists / studs / panels I. Hole diameter ( small / large ) : The HL 100 can be directly installed in holes from 7/8” to 3” in diameter using the yellow locking nut (5). The large black locking nut (6) and the adapter plate (7) are used for larger holes of 31/4” to 43/4” in diameter. Tighten the locking nut until the tool is firmly in place. The conical shape centers the HL 100 in the hole. II. Material thickness ( min. / max.
II. Aligning the laser dot horizontally (left - right): Mark the horizontal position on the second joist / stud. (No need to measure the vertical position). Turn on the laser(2). Dial the laser beam onto the mark by using the horizontal setting dial (4). ATTENTION : To ensure that the HL 100 is set up to point in the right direction, it is important that the lay out and drilling of the first joist/stud , as well as the horizontal measurement on the second joist/stud is done accurately. III.
IV. Continue to drill The laser is now correctly aligned. Drill the second hole by setting the drill bit directly on the center of the laser dot location. Clear the debris from the hole, if necessary, to allow laser beam to pass through. The laser dot will now show the correct location of the hole to be drilled on the third joist / stud. Continue to drill the following joists / studs by using the center of the laser dot as the exact hole location.
Warning: This is a class IIIa laser. Do not look directly into the laser beam ! Keep this product away from children ! The goggles supplied with these units are not safety goggles. They enable you to see the laser beam more clearly in bright light conditions. 4. Checking the calibration The HL 100 has been designed for building site use and leaves our factory perfectly calibrated. As with any precision instrument, however, its calibration must be checked regularly.
7. Technical data Laser type: Red diode laser, wavelength 650 nm Output: < 5 mW, Laser Class IIIa This product complies with the applicable requirements of 21CFR parts 1040.10 and 1040.11. Adjustment range: approx. ± 3° Accuracy: Up-right position: ± 0,5 mm/m or ± 1/16” over 10 ft Over head position: ± 0,7 mm/m or ± 3/32” over 10 ft Plumb: ± 1 mm/m or ± 1/8” over 10 ft Batteries: 2 x 1,5 V alkaline cell, size AA, LR6 Operating life: Approx.
STABILA Inc. 332 Industrial Drive South Elgin , IL 60177 1.800.869.7460 www.stabila.