by freecomm 700 Portable PMR 446 Manuel d’utilisation
GÉNÉRALITÉS Afin d’utiliser vos émetteurs de façon optimale et d’en jouir pleinement, nous vous recommandons de lire attentivement ce manuel d’utilisation. Respecter impérativement les consignes de sécurité afin de prévenir d’éventuels risques pour vous ou votre entourage et d’endommager le matériel. Si vous prêtez ou vendez le matériel, n’oubliez pas d’y joindre le manuel d’utilisation.
Les postes radio, les accessoires, les piles ou l’emballage doivent être mis hors de portée des enfants. En cas de fumée ou d’une odeur se dégageant des appareils, les éteindre immédiatement et retirer les accus/piles du boîtier. Contacter rapidement un spécialiste. Conserver vos émetteurs et les accessoires à l’abri de l’humidité, de toute source de chaleur, de la poussière et des chocs. Ne pas utiliser les appareils avec des températures inférieures à -20°C ou supérieures à +50°C.
La portée dépend de nombreux facteurs. Outre la puissance d’émission régulée par la loi, la position de l’antenne (exemple l’antenne doit être orientée verticalement de sorte qu’elle puisse transmettre librement son signal), l’alimentation en énergie (des accus complètement chargés permettent d’exploiter pleinement la portée) et avant tout l’environnement dans lequel la radiocommunication s’effectue, jouent un rôle important.
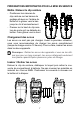
L’AFFICHEUR LCD Indique le numéro du canal choisi. Indique le mode d’émission. Indique la réception d’un signal. Indique l’activation de la fonction VOX. Indique l’activation de la fonction Double Veille. Indique l’activation de la fonction SCAN. Indique la tonalité choisie pour la fonction CTCSS. Indique le code choisi pour la fonction DCS. Indique le niveau de charge des accus (en 3 niveaux). Indique le mode de réception d’un signal d’appel (mélodie).
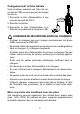
FONCTIONS ET CONNEXIONS 1. Antenne. L’antenne est fixée sur le boîtier et ne peut être désolidarisée. Ne jamais essayer de la dévisser. 2. Afficheur LCD. 3. Touche PTT. Appuyer pour émettre. 4. Touches s / t (Up/ Down). Elles permettent de naviguer dans le menu. 5. Touche LED. Allume / Éteint la lampe LED (avec fonction SOS). 6. Touche d’Appel . Émission d’une tonalité d’avertissement. 7. Haut-parleur. 8. Microphone. 9. Touche radio FM. Allume / Éteint la radio. 10. Touche Menu .
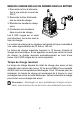
PRÉPARATIONS IMPORTANTES POUR LA MISE EN SERVICE Mettre / Enlever le clip ceinture - Positionner les rainures du clip ceinture sur les barres de guidage situées sur l’arrière du boîtier et le glisser vers le bas jusqu’au clic d’enclenchement. - Presser sur le haut du clip ceinture de sorte qu’il se détache du boîtier. Faire glisser vers le haut. Chargement des accus Les accus ne sont pas pré chargés.
MISE EN CHARGE DES ACCUS INSÉRÉS DANS LE BOÎTIER 1. Raccorder le bloc d’alimentation à une prise de courant de 230 V. 2. Raccorder le bloc d’alimentation au socle de charge. 3. Éteindre les émetteurs-récepteurs. 4. Positionner les émetteurs dans le socle de charge. Les 2 LED rouges sur le socle sont allumées, les accus sont en train de charger. Le courant de charge de ce chargeur est ajusté de façon invariable à une valeur approximative de 75 mA ou 150 mA. Le temps de charge maximale équivaut à 12 heures.
Chargement par la fiche latérale Votre émetteur possède une fiche de raccordement (12) qui vous permet de charger les accus. 1. Raccorder le bloc d’alimentation à une prise de courant de 230 V. 2. Éteindre l’émetteur. 3. Raccorder le bloc d’alimentation à la fiche de raccordement de l’émetteur (12). CONSIGNES DE SÉCURITÉ RELATIVES AU CHARGEUR - N’utiliser le chargeur que pour charger exclusivement les accus NiMH livrés avec le PMR 446.
En cas de besoin, remplacer toujours toutes les piles. Ne jamais mélanger des piles de types différents, de capacités différentes ou combinées avec des accus rechargeables. Ne jamais mettre des appareils munis de piles (non rechargeables) dans le chargeur. Il y a danger d’explosion. Retirer les piles des émetteurs, si vous ne les utilisez pas pour un long moment. Consignes pour le recyclage des accus / piles Ne pas jeter les accus et les piles usagés avec les ordures ménagères.
FONCTIONS Remarque : Si vous ne confirmez pas un réglage dans un délai de 10 secondes, l’appareil s’ajuste automatiquement au réglage précédent. Mise en marche Tourner le bouton Marche/Arrêt (13), dans le sens des aiguilles d’une montre pour allumer l’émetteur. Un bip sonore est émis à chaque fois que l’on allume le poste. Tourner le bouton Marche / Arrêt (13), dans le sens contraire des aiguilles d’une montre pour éteindre l’émetteur. Réglage du volume Régler le volume en tournant le bouton (13).
bruit de fond en l’absence de communication. Cependant dans certaines conditions, il se peut que des ordinateurs ou des appareils électriques/électroniques perturbent le squelch. En raison d’un récepteur très sensible, de tels parasites sont normaux et inévitables. Si de tels bruits parasites devaient persister, éloigner le récepteur de la source de parasites et orienter l’antenne de telle manière qu’il n’y ait plus d’obstacle.
Désactiver la fonction CTCSS 1. Appuyer 2 fois sur la touche menu clignote. (10). La tonalité active 2. À l’aide des touches s/t (4), sélectionner «00». 3. Confirmer votre choix en appuyant sur la touche PTT (3). 4. «CTCSS» disparaît de l’afficheur. Digital Code System Votre émetteur est muni de la fonction DCS (Digital Code System). Le DCS vous permet de ne pas entendre les appels indésirables de tierces personnes qui utilisent la même fréquence. L’appareil dispose de 83 codes différents.
La sensibilité du VOX est réglable sur 3 niveaux (niveau 1 = sensibilité basse / niveau 2 = sensibilité moyenne / niveau 3 = sensibilité haute). Activer la fonction VOX 1. Appuyer 4 fois sur la touche menu (10). «VOX OFF» clignote. 2. À l’aide des touches s/t (4), ajuster le niveau de sensibilité. 3. Confirmer votre choix en appuyant sur la touche PTT (3). 4. «VOX» reste afficher en permanence. Désactiver la fonction VOX 1. Appuyer 4 fois sur la touche menu lité actuel clignote. (10).
2. Utiliser la touche s ou t (4), pour commencer le scan. 3. Appuyer sur la touche PTT (3) pour arrêter le balayage. «SCAN» et «CTCSS» disparaissent de l’afficheur. Activer / Désactiver la fonction SCAN (DCS) (10). «SCAN» et «DCS 1. Appuyer 7 fois sur la touche menu 00» clignotent. 2. Utiliser la touche s ou t (4), pour commencer le scan. 3. Appuyer sur la touche PTT (3) pour arrêter le balayage. «SCAN» et «DCS» disparaissent de l’afficheur.
Roger Beep (Tonalité de fin de conversation) Au relâchement de la touche PTT (3), donc à la fin de chaque transmission, un bip sonore est émis qui indique à votre interlocuteur que vous avez terminé et qu’il peut commencer à parler. Activer la fonction Roger Beep 1. Appuyer 10 fois sur la touche menu (10). «rO OFF» clignote. 2. À l’aide des touches s/t (4), sélectionner «rO ON» 3. Confirmer votre choix en appuyant sur la touche PTT (3). Désactiver la fonction Roger Beep 1.
Activer la fonction Double Veille (10). «DCM OFF» cli- 1. Appuyer 12 fois sur la touche menu gnote. 2. À l’aide des touches s/t (4), sélectionner le canal de référence souhaité. 3. Activer la fonction CTCSS ou DCS, en appuyant 1 fois sur la touche menu (10) (CTCSS) ou 2 fois (DCS). À l’aide des touches s/t (4), sélectionner la tonalité ou le code souhaité. 4. Confirmer votre choix en appuyant sur la touche PTT (3). «DCM» reste affiché en continu. Désactiver la fonction Double Veille 1.
Désactiver la fonction Surveillance Acoustique 1. Appuyer 13 fois sur la touche menu (10). «RM ON» clignote. 2. À l’aide des touches s/t (4), sélectionner «RM OFF». 3. Confirmer votre choix en appuyant sur la touche PTT (3). «RM» disparaît de l’afficheur. AUTRES FONCTIONS Verrouillage du clavier Pour éviter une mauvaise manipulation, verrouiller le clavier de l’appareil (à l’exception de la touche PTT (3) et de la touche (6)). Bloquer le clavier Maintenir la touche menu symbole s’affiche.
Remarque : la réception d’un signal est prioritaire à l’écoute de la radio FM. Si un signal arrive, sur le dernier canal sélectionné, la radio FM sera automatiquement coupée tout le temps de ce signal. À la fin de celui-ci, l’appareil basculera à nouveau en mode RADIO FM. Lampe LED avec fonction SOS Appuyer brièvement le touche LED (5) pour allumer la lampe LED (14). Un appui long sur cette même touche active la fonction SOS. Le clignotement de la lampe LED (14) émet un S.O.S. en morse.
RECHERCHE DE PANNES Panne Votre émetteur ne s’allume pas. Action Charger l’accu ou remplacer les piles. Panne Vous ne pouvez ni émettre, ni réceptionner un signal. Action Régler tous les émetteurs sur le même canal, ou le cas échéant sur le même CTCSS/DCS. Si vous êtes hors de portée, réduisez la distance avec votre partenaire. Panne Les touches ne fonctionnent pas. Action La fonction verrouillage du clavier est activée, débloquer le clavier. Panne Le canal est toujours occupé.
TABLEAU CANAUX / FRÉQUENCES Canal 1 2 3 4 5 6 7 8 Nº Fréquence (MHz) 446.00625 446.01875 446.03125 446.04375 446.05625 446.06875 446.08125 446.
GARANTIE DU CONSTRUCTEUR Le freecomm 700 est garanti 2 ans. La garantie prend effet à la date d’acquisition du produit et ne sera valable que sur présentation de la facture d’achat (ainsi conservez soigneusement la preuve d’achat) ; la période de garantie ne sera pas prolongée en cas de remplacement ou réparation du produit. La garantie s’applique pour les défauts et vices cachés conformément aux articles 1641 et suivants du Code Civil.
FÜR GUTE VERBINDUNG Siège Social / Head Office France – Route de Sète – BP 100 34540 BALARUC – Tél. : 04.67.46.27.27 – Fax : 04.67.48.48.49 Site internet : www.president-electronics.com E-mail : groupe@president-electronics.