
Installation Guide

Stack-N-Tack® Stack Stone Siding
Use and restrictions
Stack-N-Tack® siding can be used on new or existing construction. The siding is nailed or screwed onto the wall;
therefore no brick ledge is required. Stack-N-Tack is limited to a height of 30ft with normal building design. Heights may
be increased when specified by a structural engineer and approved by building officials. When a section of wall wraps
over the top of the roof, this is called a “floater”. Extra support is needed in this area prior to the installation of Stack-N-
Tack siding.
Tools needed to install
Safety glasses, gloves, ear plugs, dust mask, drill, circular or chop saw with diamond blade, measuring tape, caulking gun,
level, utility knife, hammer, stainless steel screws or nails.
Safety first is the number one priority with any construction project. Always wear safety glasses and gloves when
handling Stack-N-Tack® siding. Cutting is often a key part of installation. You can either use a circular saw or a grinder
with a dry saw diamond blade found at any hardware store. Take all necessary precautions when cutting, use safety
glasses, gloves, and dust mask.
Stack-N-Tack® Siding Installation
Before the siding can be installed the following must be done:
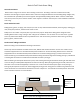
House wrap must be installed. If treated wood is used, 30lb felt and stainless fasteners must be used. Inside corners
should be wrapped with a 12” self adhesive waterproof membrane or aluminum flashing. Outside corners should be
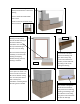
wrapped with an 8” self adhesive waterproof membrane or aluminum flashing (see Fig 2). Install a minimum of 8”
aluminum flashing or self-adhesive waterproof membrane along the bottom edge of the building (see Fig. 1). Membrane
or flashing will also need to be installed around windows and doors (see Fig 3).
With the flashing or waterproof membrane in place, start installing the siding at the bottom checking for level after each
course of siding is installed (make adjustments to level if necessary). When placing the siding on the wall, each seam on
the lower course must be overlapped by a minimum of 3” on each side of the seam by the upper course (see Fig 1).
Cutting may be required. Corners must also be staggered (see Fig 2). Each siding piece is installed using 2 fasteners and
must have at least one of its fasteners attached to a stud to a depth of 1”. The fasteners should be placed 1” above the
veneer. Stainless fasteners are recommended.
Fig. 1
Nail or screw
Flashing on siding
Siding face
Minimum 8”
flashing on
bottom of
wall
Seams or joints must be staggered a minimum of 3”