
User's Manual


8
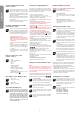
Inserting the batteries in the
remote control
3
Open the battery compartment with a screwdriver
and insert the batteries in the remote control.
Please keep in mind the correct polarity. After
having closed the compartment you can check all
functions of the remote control with the help of the
power-switch on the front.
With the power switch turned ON and functioning
correctly, the top centre LED on the remote con-
trol will light up red.
When the control LED fl ashes rapidly, the batter-
ies in the controller must be changed.
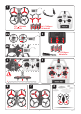
Frequency bind between model
and remote control
4
The Carrera RC Quadrocopter and the remote
control are frequency bound at purchase. If initially
there are any problems with communication be-
tween the Carrera RC Quadrocopter and the remote
control, please carry out a new frequency bind.
• Connect the battery in the model.
• WARNING! Immediately after switching it on,
place the Quadrocopter on a fl at and level
surface. The gyro-system will then set itself
automatically.
• The LEDs on the quadrocopter now fl ash rhyth-
mically.
•
Switch on the controller at the ON/OFF switch.
• Push the left-hand joystick, i.e. the throttle lever,
right to the top, then fully downwards into the
zero position.
• The binding has now been successfully estab-
lished. The LED on the controller now lights
continuously.
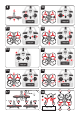
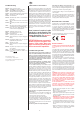
Range of functions of the
remote control
5
1. Aerial
2. Power switch (ON / OFF)
3. Control LED
4. Gas
Circling
5. Forwards / backwards
right / left banking
6. Trimmer for right / left banking
7. Trimmer for forwards / backwards
8. Trimmer for rotation
9.
Beginner/Advanced switch (30% / 60% / 100%)
10. Battery compartment
3
Description of the Quadrocopter
6
1. Rotor system
2. Rotor protection cage
7
3. Battery cable
4. Battery compartment
Choosing the fl ight area
8
The Quadrocopter may be fl own outdoors.
When you have trimmed your Quadrocopter
properly and are thoroughly familiar with its
controls and how it can perform, you can then
start to fl y it in smaller and more confi ned
spaces. Please be aware that, although it may
be calm on the ground, it may still be very
windy even a little way off the ground. If this
warning is disregarded, it may lead to total
loss of the Quadrocopter.
Checklist for fl ight preparation
This checklist is not a substitute for the contents of the oper-
ating instructions. Although it can be used as a quick-start-
guide, we strongly recommend you fi rst to read the operating
instructions in detail before you proceed.
• Check the contents of the package.
• Connect the charging unit to the source of power.
• Charge the lipo-battery as described in the section
“Recharging the LiPo rechargeable battery”.
• Fit 6 AA batteries in the controller, making sure their polar-
ity is correct.
• Look for a suitable environment for fl ying.
• Read and comply with the legal and safety regulations
governing the use of your Quadrocopters.
• Slide the battery into the battery bay on the bottom of the
Quadrocopter.
2b
• WARNING! Immediately after switching it on, place the
Quadrocopter on a fl at and level surface. The gyro-
system will then set itself automatically.
• The LEDs on the quadrocopter now fl ash rhythmically.
•
Switch on the controller at the ON/OFF switch.Be sure to
check the Beginner-Advanced switch (
13
).
Push the
left-hand joystick, i.e. the throttle lever, right to the top, then
fully downwards into the zero position. An audible signal
is made.
• Allow the Quadrocopter a few moments until the system is
correctly initialised and is ready for operation.
• Repeat the above points as required, if you wish to fl y more
Quadrocopters at the same time.
• Check the control system.
• Make yourself familiar with the control system.
• Trim the Quadrocopter as necessary as described under
14
15 16
, so that when hovering it no longer moves
from the spot without a command from the controller.
• The Quadrocopter is now ready to be fl own.
• If the Quadrocopter displays no functions, retry the above
binding procedure.
• Fly the model.
• The LED lamps on the model start to fl ash shortly before
the battery is discharged.
• Land the model.
• Disconnect the battery plug connection.
• Always switch off the remote control last.
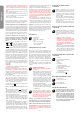
Flying the 4-channel Quadrocopter
NOTE!
Take care particularly in the fi rst few fl ights to move
the lever on the controller very gently and not over-
hurriedly. As a rule, only very small movements of the
respective levers are necessary to carry out the desired
control commands!
If you notice that the Quadrocopter moves forwards or to the
side without your touching the respective lever, please adjust
the trim of the Quadrocopter as described in (
14
15 16
).
9
+/- Gas (up / down)
To start or to fl y higher, push the gas lever on the
left cautiously forwards. To land or fl y lower, push
the gas lever on the left cautiously backwards.
10
To make the Quadrocopter circle to the left or the
right on the spot, move the lever on the left cau-
tiously to the left or the right.
11
To fl y the Quadrocopter to the left or the right,
push the lever on the right cautiously to the left or
the right.
12
To fl y the Quadrocopter forwards or backwards,
push the lever on the right cautiously forwards or
backwards.
Beginner/Advanced switch
WARNING! 100 % IS ONLY FOR EXPERIENCED PILOTS!
13
30 % = beginner mode
Signal sounds once on switching over.
60 % = medium mode
The quadrocopter reacts more sensitively than
in 30 % mode. Signal sounds twice on switching
over.
100 % = advanced mode -> 3D mode.
The Quadrocopter reacts very sensitively to joy-
stick movements. Signal sounds three times on
switching over.
Trimming the Quadrocopter
14
When hovering, if the Quadrocopter fl ies to the left
or right without you moving the lever for left / right
movement, please proceed as follows:
If the Quadrocopter moves on its own fast or slow
sideways to the left, press the lower right trimmer
for right / left tilt in steps to the right. If the Quad-
rocopter moves right, press the trimmer for right /
left tilt in steps to the left.
15
When hovering, if the Quadrocopter fl ies forwards
or backwards without you moving the lever for for-
wards or backwards movement, please proceed
as follows:
If the Quadrocopter moves on its own fast or
slow forwards, press the upper right trimmer for
forwards / backwards in steps downwards. If the
Quadrocopter moves backwards, press the trim-
mer for forwards / backwards in steps upwards.
16
When hovering and without you moving the lever for
circling on the spot, if the quadrocopter rotates to left
or right, proceed as follows:
If the quadrocopter rotates quickly or slowly to the
left around its own axis, press the trimmer for rota-
tion below left in steps to the right. If the quadrocop-
ter rotates to the right, press the trimmer for rotation
in steps to the left.
If the Quadrocopter can no longer be set to 'neutral' by press-
ing the trimmer, please carry out the following instructions:
1. Place the Quadrocopter on a fl at horizontal surface.
2. Bind the Quadrocopter and the Controller as described in
"Binding the model with the Controller".
3. Simultaneously press the gas lever and the forwards/re-
verse lever to the lower right-hand corner. The LED on the
Quadrocopter fl ashes briefl y and then lights continuously.
4. The neutral setting is now completed.
Changing the rotor blades
17
Use a screwdriver if it is necessary to remove a ro-
tor blade. Make sure that you draw the rotor blade
with great care vertically upwards, and hold the
motor from below to stabilise it. Screw the rotor
blade fi rmly back on to the quadrocopter.
18
WARNING!
Be sure to note the marking and colour, also the tilt
angle of the rotor blades!
Front left: red – marking “A”
Front right: red – marking “B”
Rear right: blue – marking “A”
Rear left: blue – marking “B”
ENGLISH