White Membrane Pocket Application Guide
RoofKit Roofing Membrane Products: Notice StaFast Building Products ("StaFast" or "Seller") disclaims all express warranties in connection with and related in any way to its RoofKit products including but not limited to EPDM, TPO, PVC membrane and all other products directly or indirectly related thereto, manufactured, distributed or supplied by StaFast Building Products in connection with this transaction (hereinafter collectively referred to as "RoofKit Products".
Table of ConTenTs Page 3. . . . . . . . . . . . . . . . . . . . . . . . . . . General Information Page 3. . . . . . . . . . . . . . . . . . . . . . . . Cautions and Warnings Page 5. . . . . . . . . . . . . . . . . . . . . . . . . . Recommended Tools Page 5. . . . . . . . . . . . . . . . . . . . . . . . . . . . Available Products Page 6. . . . . . . . . . . . . . . . . . . . . . . . . . . Surface Preparation Page 7, 8. . . . . . . . . . . . . . . . . . . . . . . . . . . . . . . . Installation Page 9. . . . .
GeneRal InfoRMaTIon This APPLICATION GUIDE has been designed to give the installer a GENERAL DESCRIPTION of a RoofKit fully adhered white roof system. This APPLICATION GUIDE is intended as a reference aid only and is not intended or meant to be all-inclusive. RoofKit User Cautions and Warnings! • The White Membrane is slippery especially when wet, dusty or covered with snow, frost or ice. Please read and follow all cautions and warnings, including notice on the white membrane roll.
• Avoid adhesive contact with eyes. Safety glasses should be worn. If adhesive comes in contact with eyes, flush for 15 minutes and call a physician. • Care must be taken with fasteners that penetrate the deck to avoid contact with electrical wiring and plumbing. • Reroofing over a wet substrate is not good roofing practice. All wet materials should be removed before proceeding with the installation of new materials. • Condensation may occur when applying adhesives at temperatures below 40o F.
ReCoMMended Tools The following list is for reference only, as tools and equipment may vary from project to project: • • • • • • • • 2-inch steel or hard roller Soft bristle push broom Scissors Chalk line Tape measure Solvent resistant rubber gloves Stir stick for adhesives 9-inch paint roller frame and several large nap, solvent compatible roller covers • Caulk gun • Extension Ladder • Screw gun and hammerdrill RoofKIT PRodUCTs avaIlable • RoofKit White Reinforced Membrane (45 mil thickness) available 6'
• RoofKit White Membrane Patch and Corner Cover Kit (6) 8" Repair Patches, 1 pint seam primer, scrub pad, 1 seam roller, and 2 wipe cloths • RoofKit White Skylight Flashing 8" x 14' • RoofKit Fastening Screws and Plates 100 of each; both 3" Roof sURfaCe PRePaRaTIon RoofKit White Reinforced Membrane will adhere to insulation boards compatible with RoofKit adhesives (this does not include polystyrene insulation).
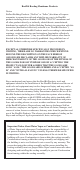
FIGURE 1 - Fastening Pattern InsTallaTIon Unroll the RoofKit White Reinforced Membrane over the substrate so that the sheet is in the desired position and is wrinkle free. If more than one roll of membrane is required, subsequent rolls must over lap the prior roll a minimum of three inches (3") for seaming. Start at the low side of roof if seaming rolls. Care should be taken to ensure the membrane overhangs the perimeter of the roof at least three inches (3").
adhesive is curing. Repositioning of the membrane is possible while the adhesive is still wet. After the adhesive begins to set-up (approximately 20 to 35 minutes) apply pressure with a push broom to ensure good contact. This application requires a porous substrate, such as High Density Fiberboard, OSB or plywood. Contact Application Method: For vertical or horizontal applications. Open and thoroughly stir the White Membrane Water Based Bonding Adhesive.
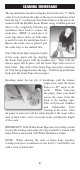
seaMInG MeMbRane The top membrane should overlap the bottom sheet by 3". Mark a line ½ inch out from the edge of the top roof membrane. Fold back the top 3" overlap and clean both surfaces of the area to be seamed with the RoofKit Seam Primer using scrubbie pad and allow to dry completely. Fold the top membrane sheet back to expose the seam area. (HINT: A small piece of seam tape that is tacky on both sides is useful to tack the membrane back.
TeRMInaTIon baR When using the Termination Bar to secure the White Reinforced Membrane over the edge of the roof, make sure that the sheet extends a minimum three inches over the roof’s edge. Center the bar in the 3” overhang and secure with fastening screws. The screws should be positioned through the pre-drilled holes along the length of the Termination Bar. Use a utility knife, to trim any excess membrane below the bar for a finished look.
Use roller to ensure good contact of top half of corner. Step 3 Remove paper backing from bottom half of corner. Step 4 Gently work the bottom half of corner into place. Be sure not to overstretch. Step 5 Use roller to ensure good contact throughout the completed corner. Step 6 Use RoofKit White Caulk around all edges of the completed corner. Step 7 InsIde CoRneR deTaIl Using scrub pad, clean entire area with RoofKit Seam Primer. Allow to dry.
Fold 8" round corner in half, remove top half of paper backing and position ½ of each top fold into the corner. Step 2 Use roller to ensure good contact of top half of corner. Step 3 Fold bottom half of corner to create a flap or “pig's ear". Step 4 Remove the remaining paper backing and press the flap against itself sealing the flap or “pig's ear". Step 6 Step 5 Clean the area behind the flap and apply RoofKit MultiPurpose Adhesive to the back side of the flap. Allow adhesive to dry.
Step 8 Use RoofKit White Caulk around all edges of the completed corner. CoveR sTRIP Step 1 Clean and/or prime the area to be covered. CAUTION: Wear protective gloves when using solvent/primer. Step 2 Center coverstrip over the prepared surface. Peel back about 8" of paper to expose the adhesive side of the strip. Step 3 Remove release paper at a 45° angle. Step 4 Gently mate the coverstrip by hand, avoiding stretching or wrinkles.
Use the seam roller to ensure good contact. Final rolling should be both perpendicular, then parallel to the length of strip. Step 6 WHITe PIPe booT WITH sTeel ClaMP Clean area around pipe with RoofKit Seam Primer. Step 1 With a scissors, cut proper diameter for pipe boot. Step 2 Slide pipe boot over pipe, press into place and remove self-adhesive paper. Step 3 Roll base of pipe boot with seam roller and install steel clamp.
PaTCHes aT T-JoInTs A T-Joint is formed when two layers of RoofKit White Roof Membrane form a seam that travels under, or over, a third layer of membrane. The center of the “T" is where the middle layer ends and the top layer bridges over the middle layer. This T-Joint can provide an opportunity for water to seep under the membrane.
Keep the bottom course of shingles a minimum of four inches (4") above the roof angle change. To adhere the bottom course of loose shingle tabs to the membrane, lift each tab and apply a bead of RoofKit White Membrane Caulk. PaTCHInG RoofKIT WHITe RoofInG MeMbRane Using scrub pad, clean entire area with RoofKit Seam Primer. Allow to dry. Step 1 Remove paper backing from 8" round patch and position the patch over the damaged area. Step 2 Use the seam roller to ensure good contact.
GlossaRY BRIDGING: Occurs when the membrane is unsupported at a juncture or angle change. Moisture condensing on the bottom of the membrane can cause further delamination. Areas where bridging occurs should be repaired and re-flashed. COVER STRIP: Six inch (6") wide cured white membrane with butyl tape laminated to one side. Used when stripping in metal edge details, repairing cuts in the field membrane. FASTENING SCREWS AND PLATES: Used to mechanically attach (fasten) the insulation board to the roof deck.
WHITE PIPE BOOT AND CLAMP: Pre-molded white boot. The most cost effective way to flash pipe protrusions. The stainless steel clamp is used to secure the top of the pipe to the Pipe Boot. WHITE CAULK: Applied at the top of all Fastening/ Termination Bar applications; at the top of Pipe Boots and after the Pipe Boot Clamp has been installed, seams, patches, and to adhere shingle tabs to RoofKit White Roofing Membrane.
RevIeW of aPPlICaTIon PRoCedURes 1. a. b. c. SUBSTRATE Plywood, OSB or high-density wood fiberboard. Concrete. Insulation boards – all but polystyrene. 2. a. b. c. INSULATION Insulation joints are butted together with no gaps. Correct fastener pattern and quantity used. 100% adhesion of the membrane to the substrate. 3. FIELD SEAMS a. Seam Primer should be visible past the leading edge of the field seams (over scrub). b. There are no wrinkles, void or fishmouths in any portion of the field seams. c.
7. OVERALL APPEARANCE a. Fastening/Termination Bars are level. b. Seam widths are uniform and completely rolled in. c. All trash or debris is removed from job site. NOTE: OVERALL APPEARANCE IS VERY IMPORTANT.
TREATED WOOD BLOCKING 6” ROOFKIT COVER STRIP 6” ROOFKIT REINFORCED WHITE MEMBRANE METAL FASCIA FASTENED AT 4” O.C. APPROVED INSULATION APPROVED DECKING CONTINUOUS CLIP STRIP FASTENED AT 12” O.C.
TREATED WOOD BLOCKING 6” ROOFKIT COVER STRIP 6” ROOFKIT REINFORCED WHITE MEMBRANE METAL DRIP EDGE FASCIA APPROVED INSULATION APPROVED DECKING ROOFKIT WATER STOP SCREWS 4” O.C.
REFER T0 TERMINATION DETAILS ROOFKIT REINFORCED WHITE MEMBRANE WMWB ADHESIVE IN CONTACT METHOD WMWB ADHESIVE IN CONTACT METHOD ROOFKIT FASTENING SCREWS AND PLATES ROOFKIT 6” REINFORCED STRIP APPROVED INSULATION APPROVED DECKING REINFORCED MEMBRANE STRIP AT BASE TERMINATION 23 WRK 201
ROOFKIT WHITE MEMBRANE CAULK CONTINUOUS ROOFKIT ALUMINUM FASTENING TERMINATION BAR MASONRY ANCHORS @ 6” O.C.
METAL COPING TREATED WOOD BLOCKING CONTINUOUS CLIP STRIP SECURED @ 12” O.C.
ROOFKIT WATER STOP DRAIN HUB MAX. SLOPE INTO DRAIN PUMP IS 4:12 (33.36%) ROOFKIT REINFORCED WHITE MEMBRANE DRAIN STRAINER APPROVED INSULATION APPROVED STRUCTURAL DECKING NOTE: BOLT ROOFKIT WATER STOP 1. IF SEAMS RUN WITHIN 12” OF DRAIN, INSTALL A 4’ X 4’ MIN. MEMBRANE PATCH ON TOP OF MEMBRANE ENSURING SEAM IS COVERED. 2. REROOFING APPLICATIONS: A. REMOVE EXISTING FLASHING DOWN TO METAL SUMP. B. REPAIR OR REPLACE BROKEN CLAMPING RING. DRAIN HUB C.
27 RoofKit White Membrane Seam Tape RoofKit White Membrane Seam Kit RoofKit White Membrane Water-Based Adhesive izes S oll RoofKit Reinforced White Membrane 3R Item 3” x 50' 1 roll 3” x 25' of seam tape, 1 pint seam primer, scrub pad,1 seam roller and 2 wipe cloths 1 Gallon 3-1/2 Gallon (1) 6'6" x 20' – 130 sq ft per roll (130 sq ft per tube) (2) 6'6" x 20' – 130 sq ft per roll (260 sq ft per tube) 10' x 20' – 200 sq ft per roll 10' x 100' – 1000 sq ft per roll Content/Size/Coverage Estimate
28 RoofKit White Peel & Stick Pipe Boot RoofKit White Membrane Patch & Corner Cover Kit RoofKit White Membrane Cover Strip w/ Tape RoofKit White Skylight Flashing Item 1 pipe boot & 1 clamp (6) 8" Repair Patches, 1 pint seam primer, scrub pad,1 seam roller, and 2 wipe cloths 6” x 50' 8" x 14' Content/Size/Coverage Estimate Qty Price Total Materials Estimating Chart
29 3" Fasteners/Plates RoofKit White Membrane Caulk RoofKit White Term Bar & Term Bar Cover (Sold Separate) Aluminum Termination Bar Item 100 pieces of each per box 10.
noTes 30
7095 Americana Parkway • Reynoldsburg, OH 43068 1-800-225-4714 EXT. 7889 • www.RoofKitRoofing.