
Installation Guide


Covering with plastic wrap directly on top of product prior to sealing container will help preserve freshness.
e. Certain tile surfaces may be stained when grouted with colored grout. Follow tile manufacturer recommendations or test.
f. Use on grout joints from 1⁄16 in. up to 3/16” inches (1.6mm to 4.76mm) in width.
g. Do not grout over existing epoxy grout installations.
h. Not for use in swimming pools or exterior applications.
i. Do not add water.
j. Do not seal grout.
k. Grout joints shall be a minimum of 1/6” and not greater than 3/16”.
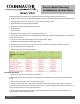
l. Be sure you have the proper amount of grout before beginning the job. Coverage of NovaFloor Luxury Vinyl Tile Grout is
shown in the table below.
m. Tiles must be clean and well bonded to the substrate before grout is applied.
n. Do not grout immediately after installation, wait 24 hours.
o. Grout joints must be clean and dry, use of a vacuum is recommended to ensure there is no debris in the joints.
p. Use of a rigid rubber float is recommended.
q. Remove all joint spacers before installing grout.
Installing the Grout
a. Area must be clean, dry, and free of dirt, dust and debris.
b. Begin grouting in one corner of the work area away from the exit, working across the room and backwards toward
the exit.
c. Grout no more than 10 square feet (3 square meters) at a time.
d. Using the rigid grout float, put a small amount of grout on the long edge of the float and firmly press the grout into
the grout joint. Do not work the grout across the face of the tile in a circular or swishing motion. Continue to work in this
manner around the edges of the tile in your working space.
e. Joints should be fully filled and free of gaps and voids. Grout should be flush with the bottom of the bevel or just
below the edge of the finished edge of the tile.
MARCH 2017 5
Peel-n-Stick Flooring
Installation Instructions