
Installation Guide

2 3-in-1 Trim as a T-MOLDING
Step 3
Step 2
Step 1
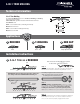
Install the flooring planks by leaving a 1" inch (25mm) gap
for the installation of the molding. Center the track and
shim between the two laminate floors and screw them
to the sub floor by using #4x5/8" screws.
Line the molding up with the track and fit one end into
the molding. Using a rubber mallet, tap the molding until
it engages with the track. Use your hand to guide the
molding into the track as you work your way down,
tapping it in, similar to how you would close a zip-loc bag.
Next, go up and down the molding several times, tapping it
all the way into the track. You can use a little more force
once you are sure it is properly engaged in the track.
Track
Shim
1”
Rubber
Mallet
IMPORTANT: Rock molding back & forth to make sure
it is sitting inside the track BEFORE hammering in!
If molding wiggles back and forth, it is
NOT set in the track properly and will
be damaged when hammered in!
Sub Floor
9
This end of the molding MUST be placed
on the lower of the two surfaces.
This end of the molding MUST be placed
on the lower of the two surfaces.
Step 3
Step 2
Step 1
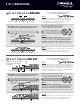
NOTE: Carpet Tap Down trim
must be even with the top
of the track.
1”
Line the molding up with the track and fit one end into
the molding. Using a rubber mallet, tap the molding until it
engages with the track. Use your hand to guide the
molding into the track as you work your way down,
tapping it in, similar to how you would close a zip-loc bag.
Next, go up and down the molding several times, tapping it
all the way into the track. You can use a little more force
once you are sure it is properly engaged in the track.
Install the flooring plank and carpet (using a carpet tap down
trim) by leaving a 1" inch (25mm) gap for the installation of
the molding. Position the track 3/4” from where the of the
Tap Down trim meets the carpet and screw them to the sub
floor by using #4x5/8" screws. The carpet tap down trim
must be even with the top of the track.
Carpet Tap
Down Trim
Track
IMPORTANT: Rock molding back & forth to make sure
it is sitting inside the track BEFORE hammering in!
If molding wiggles back and forth, it is
NOT set in the track properly and will
be damaged when hammered in!
Rubber Mallet
1/8”
Use Shim
as Guide
3 3-in-1 Trim as a END CAP
Sub Floor
3-IN-1 TRIM MOLDING
3-in-1 Trim
Molding
Track
3-in-1 Trim
Molding