
Installation Guide


9
SURE
WOOD
~
LNL
INSTALLATION
3
NEWEL POST AND RAIL ASSEMBLY FOR OVER-THE-POST SYSTEMS
FOR PIN-TOP NEWELS WHERE RAIL RUNS ON TOP OF THE NEWELS
TOOLS YOU NEED:
; Wear Safety glasses
; Drill
; Drill bit set
; Wrench set
; Measuring tape
; Saw
; Framing Square
; Pencil
MATERIALS:
; Block top / box newels
; Newel attachment kits
; Lag bolts
; Oak plugs
; Wood glue
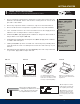
FIG 3-1. MARK YOUR STAIR FOR INSTALLATION
Mark position of
landing newel
and centerline
of rail.
Baluster centerline
Face of stringer
Mark position of
baluster centerpoint.
Pin top starting newel
1. Layout your staircase (FIG 3-1)directly on your treads and
landings. Mark newel and baluster position and centerlines. Use
layouts for Turnouts (FIG 3-1a) and Opening Cap (FIG 3-1b) if
applicable.
2. For a volute fitting, the centerline of the balustrade (assembled
set of balusters, rail and newels) should be laid out. On a kneewall
stair, the balustrade should be centered on the kneewall. On an
open tread stair, the centerline should be 1/2 of the baluster square
in from the face of the stringer (ex. 5/8” for a 1-1/4” baluster).
3. Assemble the handrail and fittings (FIG 3-2a) with rail on the
staircase. Use rail bolts or Spring Bolts® to assemble fittings to
handrail. See diagram 3-2b for rail bolt details.
4. Apply wood glue to ends of rail and fittings. Assemble and install
nut. Tighten nut with wrench, then glue wood plug into hole.
5. Clamp or secure assembled handrail on top of stair. Note
centerpoints of newels and mark on treads. In some cases, a
notch will have to be cut in nosing of a tread on a landing.
(Continued on Page 10)
FIG 3-1a. Layout for Turnout fitting
9
FIG 3-1b. Layout for Opening Cap fitting
Pin top starting newel
Pin top starting newel
A
1/4” dia.
hole
Rail
Bolt
1” hole
3/8” dia.
hole
2-1/8”
15/16"
1-3/8"
Nut and
washer
RAIL
FITTING
B
FIG 3-2a. HANDRAIL AND FITTING ASSEMBLY FIG 3-2b. HANDRAIL AND FITTING ASSEMBLY