
Installation Guide


7
SURE
WOOD
~
LNL
GETTING STARTED
1
TREAD & RISER REPLACEMENT
UPGRADE THE LOOK OF YOUR STAIRCASE WITH HARDWOOD TREADS
1. Remove existing wood balusters by cutting them 12-inches below where they are
attached to the handrail. Twist to remove them, ensuring holes are clear of wood
glue, nails or other debris.
2. Remove any carpet from surface of staircase to expose wood treads and risers.
3. Remove treads and risers using hammer or prybar. Remove any nails and debris.
4. Once old treads and risers are removed, install new risers first. Apply bead of
adhesive to face of stringer. Nail or screw risers in place.
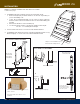
5. Install treads (FIG 1-1) by applying bead of adhesive to stringer run. Place treads on
stringer. Nail or screw in place (FIG 1-2).
6. Install landing tread at landings and any balconies (FIG 1-3). Apply bead of adhesive
on subfloor and nail in place.
7. Landing tread (FIG 1-3) can be used with 3/4” oak flooring along a landing when
solid oak treads are used. Use landing tread on balconies and at the top of your
staircase.
8. Add a finished look by applying oak returns (FIG 1-4) to the ends of exposed treads
on open stairs. Apply with wood glue and nails.
WEAR
SAFETY
GLASSES
TOOLS YOU NEED:
;
Wear Safety glasses
; Prybar
; Hammer
; Saw
; Adjustable square
; Measuring tape
; Drill
; Construction adhesive
; Caulk gun
; Screws
MATERIALS:
; Oak Treads
; Risers
; Loose oak returns (optional)
; Landing Tread
Most codes require treads to
overhang risers between 3/4" and
1-1/4”. Check your local codes
for requirements in your area.
TIP 1: Drill pilot holes before
nailing treads to minimize the
risk of splitting and cracking
TIP 2: Applying construction
adhesive to stringers before
installing treads now will help
prevent squeaky treads in the
future.
Measure and cut each step
separately to ensure a tight fit.
FIG 1-1
For best appearance, install
risers first, then install treads.
FIG 1-2
Use landing tread to border
balconies and landings. Landing
tread can be used with 3/4" oak
flooring or carpet and padding.
FIG 1-3
Attach loose oak returns to the
sides of treads for a finished and
elegant look.
FIG 1-4
9
9
9
CHECK LOCAL
BUILDING
CODES FOR
REQUIREMENTS IN
YOUR AREA.