
Installation Guide


13
SURE
WOOD
~
LNL
INSTALLATION
9
CHECK LOCAL
BUILDING
CODE. FOR
REQUIREMENTS IN
YOUR AREA.
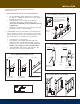
5. BALUSTER INSTALLATION ON SHOERAIL (FIG 5-5):
• Use an adjustable square (C) and level to determine
the angle to cut balusters. Allow for 1/4” plow depth on
handrail and shoerail.
• Cut balusters to correct length. Once spacing is
determined, glue and toe nail balusters in place.
Check your local building code for baluster spacing
requirements.
• Cut fillet pieces, being sure to match angles. Glue and
nail in place using 1/2” finishing nails.
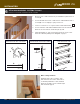
6. OPEN TREAD OPTION. Using marks on tread made from
Step 2, drill holes using the same size bit as the pin on the
bottom of baluster (ex: 3/4"). If your balusters do not have
pins on the bottom, do not drill holes in your treads.
• Cut balusters to correct length.
• Insert baluster into handrail and adjust with level.
• Apply wood glue and nail baluster in place, making
sure balusters are evenly spaced. Check your local
building code for baluster spacing requirements.
• Cut handrail fillet, being sure to match angles. Glue
and nail in place using 1/2" finishing nails.
Mark and
cut here
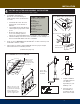
FIG 5-2. HANDRAIL & SHOERAIL CUTTING GUIDE
OPTION 1 OPTION 2
FIG 5-3. HANDRAIL ATTACHMENT OPTIONS
Attach to newel with
wood screw
Lag bolt through
face of newel.
Wood
plug
Most building codes require
shoerail to be installed so
that a 6" sphere cannot pass
through any space.
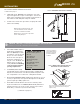
Screw to Kneewall
OPTION 3
FIG 5-4. HANDRAIL ATTACHMENT OPTIONS
Toe-nailed
Finishing Nails
OPTION 2
9
Countersink
wood screws
OPTION 1
9
C
FIG 5-5. BALUSTER CUTS FOR SHOERAIL
9
9
SQUARE TOP BALUSTER AND HANDRAIL INSTALLATION
Continued from page 12