
Installation Guide


11
SURE
WOOD
~
LNL
INSTALLATION
4
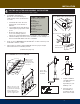
PIN-TOP BALUSTER AND HANDRAIL INSTALLATION
FOR POST-TO-POST AND OVER-THE-POST RAIL SYSTEMS.
1. See FIG 4-1. Mark baluster
placement on treads allowing for
equal spacing and no greater than 4”
on center.
• Drill treads the same size and
depth as pin on the bottom of
baluster.
• Lay handrail along stairs allowing
extra length for proper fit to newel
posts.
• Being sure that rail does not
move, use framing square to
transfer wood tread markings from each tread to side of handrail.
• Transfer markings to bottom center of handrail. Locate markings on
bottom of handrail. Mark center line of handrail.
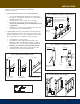
2. POST-TO-POST. (FIG 4-2)Rotate handrail 180
o
on stairs so balcony side
of handrail is at base of stairs.
3. Using newels as guides, mark handrail (a) and cut to proper length.
Follow instructions for attaching newels.
(Continued on page 12)
Mark center points on rail
Transfer marks to
underside of rail.
TOOLS YOU NEED:
; Wear Safety glasses
; Drill
; Drill bit set
; Drill guide
; Measuring tape
; Level
; Saw
; Framing Square
; Pencil
FIG 4-1. MARK STAIR FOR INSTALLATION
9
G
a.
a.
H
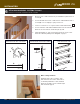
36” to 42”
above front
of tread.
1. Height of handrail
should be between
36” and 42”,
depending on your
building code.
2. Place the top of
the handrail one
inch below the top
block of the newel.
1
2
9
9
CHECK LOCAL
BUILDING
CODES FOR
REQUIREMENTS IN
YOUR AREA.
FIG 4-2. PREPARING POST TO POST HANDRAIL
TIP: Use pieces of scrap
lumber (ex: 2x4's) to test
measurements and angles
before cutting actual
handrail. "Measure twice,
cut once" applies here!
TIP: Use a Drill
Guide system
to keep angle of
holes precise and
consistent.