
Installation Guide


12
www.surewood-lnl.com © 2013 SureWood-LNL All Rights Reserved
W
OOD
~
LNL
INSTALLATION
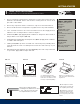
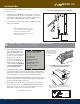
4. OVER-THE-POST. (FIG 4-3) Place handrail on top of pin
top newels (I), but do not glue or nail in place. Use level to
mark centers of balusters (J) on rail, balcony and treads of
stair. Drill holes with drill guide using 5/8" drill bit.
5. For balconies, follow same procedures, keeping rail on flat
surface when drilling.
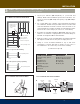
TIP 1: Install pin top balusters first. Then
lower handrail down onto the balusters
after holes are drilled into handrail.
TIP 2: Practice rail cuts with scrap lumber
before cutting final piece.
I
J
PIN-TOP BALUSTER AND HANDRAIL INSTALLATION
Continued from page 11
FIG 4-3. PREPARING OVER THE POST HANDRAIL
5
SQUARE TOP BALUSTER AND HANDRAIL INSTALLATION
FOR POST -TO-POST AND OVER-THE-POST RAIL SYSTEMS.
Square top balusters
are installed after the
bottom shoerail and
plowed handrail are
installed.
TOOLS YOU NEED:
; Wear Safety glasses
; Drill
; Drill bit set
; Drill guide
; Measuring tape
; Level
; Adjustable Square
; Miter Saw
; Framing Square
; Pencil
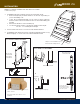
FIG 5-1: MARK STAIR FOR INSTALLATION O.
BALUSTERS ON OPEN STAIRCASE.
Note. Some balusters do not have pins on the
bottom. If your balusters do not have pins,
skip this step.
9
CHECK LOCAL
BUILDING
CODES FOR
REQUIREMENTS IN
YOUR AREA.
1. FOR OPEN STAIRS ONLY. To
install square top balusters,
drill holes (FIG 5-1) in treads
according to your layout from
Step 3. Use same size drill
bit as the size of the pin on
the bottom of baluster (ex:
3/4" pin = 3/4" bit. Make sure
baluster holes are spaced
evenly. Check local building
codes for proper baluster
spacing requirements.
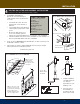
2. See FIG 5-2 (NEXT PAGE).
Lay handrail and shoe rail (if used) along stairs, marking where
they intersect with newels. Cut rail along marks using miter saw.
Use scrap lumber to test cuts before cutting finish material.
3. Attach handrail (FIG 5-3) (NEXT PAGE) using option #1 (3” wood
screws) or option #2 (4-1/2” lag bolts through front of rail). Both
options require pre-drilling a pilot hole.
4. SHOE RAIL OPTION. Measure and cut shoe rail using same
angles as handrail cuts. See FIG 5-4 (NEXT PAGE). Attach shoe
rail using OPTION 1 (3” wood screws), OPTION 2 (toe-nailed
finish nails), or OPTION 3 (screwed to kneewall).
(continued on page 13)
9