Owner's Manual WARNING Exercise can present a health risk. Consult a physician before beginning any exercise program with this equipment. If you feel faint or dizzy, immediately discontinue use of this equipment. Serious bodily injury can occur if this equipment is not assembled and used correctly. Serious bodily injury can also occur if all instructions are not followed. Keep others and pets away from equipment when in use. Always make sure all bolts and nuts are tightened prior to each use.
TABLE OF CONTENTS Page Safety Instructions Before You Begin Equipment Warning & Notice Labels Hardware Identification Chart Assembly Instructions Set Up Instructions Operational Instructions Computer Instructions Storage Page 2 4 5 6 7 12 13 17 23 Maintenance Troubleshooting Conditioning Guidelines Warm-Up and Cool-Down Warranty Product Parts Drawing Parts List Fax/Mail Ordering Form 23 24 25 26 27 28 29 31 SAFETY INSTRUCTIONS WARNING: To reduce the risk of serious injury, read the following Safety Ins
CALL US FIRST THANK YOU FOR PURCHASING THE Avari GX8 Elliptical Trainer To help you get started, we have pre-assembled most of your Avari GX8 Elliptical Trainer at the factory with the exception of those few parts left unassembled for shipping purposes. Simply follow the few assembly instructions set forth in this manual. With regular workouts you will be getting your body into shape and on your way to achieving a happier and healthier lifestyle.
BEFORE YOU BEGIN Although Stamina constructs its products with the finest materials and uses the highest standards of manufacturing and quality control, there can sometimes be missing parts or incorrectly sized parts. If you have any questions or problems with the parts included with your Avari GX8, please do not return the product. Contact us FIRST! If a part is missing or defective, please call us toll free at 1-800-375-7520 (in the U.S.). Our Customer Service Staff is available to assist you from 7:30 A.
EQUIPMENT WARNING & NOTICE LABELS This chart is provided to help identify the warning & notice labels on the Avari to familiarize yourself with all of the warning & notice labels. Labels are actual size W1 WARNING LABEL(95) W2 BATTERY WARNING LABEL(96) 5 GX8.
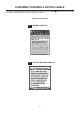
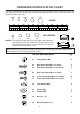
HARDWARE IDENTIFICATION CHART This chart is provided to help identify the hardware used in the assembly process. Place the washers, the end of the bolts, or screws on the circles to check for the correct diameter. Use the small scale to check the length of the bolts and screws. 3/16" 1/4" 5/16" 3/8" 1/2" INCHES 0 1/2 1 1/2 2 1/2 3 1/2 4 1/2 5 1/2 6 in. mm.
ASSEMBLY INSTRUCTIONS Place all parts from the box in a cleared area and position them on the floor in front of you. Remove all packing materials from your area and place them back into the box. Do not dispose of the packing materials until assembly is completed. Read each step carefully before beginning. If you are missing a part please call our toll-free number for assistance 1 (800) 375-7520 or e-mail us at: parts@staminaproducts.
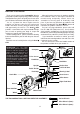
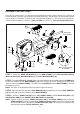
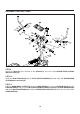
ASSEMBLY INSTRUCTIONS STEP 5 CAUTION: Be careful not to damage the BASE CONNECTION WIRE(18) and CONNECTION WIRE(19) when assembling the UPRIGHT(3). Attach the UPRIGHT(3) to the MAIN FRAME(1) with the NYLOCK NUTS(M10x1.5)(84) and WASHERS (M10)(78). Plug the BASE CONNECTION WIRE(18) into the CONNECTION WIRE(19). STEP 6 Connect the LINKS(36) to the ROCKER ARMS(4) at both sides with D-SHAPED SHAFT(42), WASHERS (M6)(77), and BUTTON HEAD BOLTS(M6x1x12mm)(62).
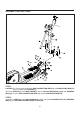
ASSEMBLY INSTRUCTIONS Slot STEP 7 Place the LEFT NOSE COVER(34) and RIGHT NOSE COVER(35) at both sides of the UPRIGHT(3). Bolt the nose covers together with the ROUND HEAD SCREW(M5x0.8x35mm)(71) on the top. Then slide the nose covers down and attach them to the MAIN FRAME(1) with ROUND HEAD SCREW(M5x0.8x35mm)(71). STEP 8 Refer to the inset drawing. Lift up the RIGHT PEDAL ARM(7) slightly. Then place a ROLLER COVER(33) to cover the ROLLER(30).
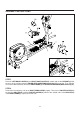
ASSEMBLY INSTRUCTIONS STEP 9 Attach the TRAY(56) to the bracket on the UPRIGHT(3) and secure with ROUND HEAD SCREWS (M5x0.8x15mm)(70). STEP 10 Attach the PIVOT ENDCAPS(51) to the PIVOT CUFF BUSHINGS(45) at both sides with ROUND HEAD SCREWS(M5x0.8x15mm)(70). STEP 11 Slide the HANDLEBAR SLEEVE(52) onto the HANDLEBARS(5). Insert the HANDLEBARS(5) onto the ROCKER ARMS(4) and secure with BUTTON HEAD BOLTS(M6x1x16mm)(63), CLAMP WASHERS(M6) (53), and LOCK WASHERS(M6)(75).
ASSEMBLY INSTRUCTIONS ATTENTION: Use only NiMH (Nickel Metal Hydride) rechargeable batteries with this product. The higher voltage from other types of batteries may damage this equipment. Failure to use NiMH rechargeable batteries will void your warranty and may result in damage to your machine. Stamina is not responsible for non-compliance with correct battery usage. STEP 12 Install four AA NiMH (Nickel Metal Hydride) rechargeable batteries into the COMPUTER(20).
SET UP INSTRUCTIONS Place the Avari GX8 in the area where it will be used. It is recommended that the Avari GX8 be placed on an equipment mat. The maximum usage dimensions of Avari GX8 are approximately 99 1/4" long x 25 5/8" wide x 64 7/8" tall. (These dimensions may vary up to one inch.) An area 4 feet wide x 9 feet long is required for safe operation of the Avari GX8. Make sure that adequate space is available for access to and passage around the Avari GX8.
OPERATIONAL INSTRUCTIONS PEDAL DIVIDER ADJUSTMENT The PEDAL DIVIDER(90) position can be adjusted to fit your shoes. You may select the front or the back of the PEDAL CAPS(29) for foot placement. You will have less vertical movement in the elliptical stride if you place your feet at the front of the PEDAL CAPS(29). 1. Press down the PUSH BUTTON(91) and press the PEDAL DIVIDER(90) down slightly to slide the PEDAL DIVIDER(90) to new position. Release the button to lock the PEDAL DIVIDER(90) in position.
OPERATIONAL INSTRUCTIONS (continued) Load Level Adjustment The load level of Avari GX8 can be changed at any time during your workout. Adjusting the load level will allow you to increase or decrease your intensity level. Forward and Reverse The Avari GX8 can be used in the forward and reverse direction to vary the muscles that you work out. This will also vary your workout helping you to stay motivated. To change directions, simply slow the pedals down until they stop and switch directions.
OPERATIONAL INSTRUCTIONS (continued) The HEART RATE TRANSMITTER(97) worn around your chest sends your heart rate information to a receiver in your computer monitor so your heart rate is tracked while you exercise. This is the most reliable way to measure your heart rate to make sure you are exercising within your target heart rate zone so you get the most out of your workout time. Using the Pulse Sensors To get the most accurate reading from the Pulse Sensors, follow these steps.
OPERATIONAL INSTRUCTIONS (continued) Transmission LED Indicator For checking operation of transmitter, the red LED indicator will flash indicating the transmitter is in operation. Adjust the transmitter position to keep the LED indicator flashing consistently for accurate readings. (See illustration below.
COMPUTER INSTRUCTIONS Your Avari GX8 Elliptical Trainer workout is controlled by an advanced computer system. Use the pre-programmed Basic, Advanced or Interactive workout profiles to vary your workouts from session to session, or use the Quick Start workout and set your own pace. Whatever workout you choose, the computer monitor will track and display your time, distance, calories burned, and heart rate information to keep you motivated and on track to achieve your fitness goals.
COMPUTER INSTRUCTIONS A B I C H D G E F LCD DISPLAY INSTRUCTIONS A Scrolling Message Center: Displays both user instructions and workout parameters throughout the workout. B Watts/Level: Displays the amount of power or resistance level being exerted. C Segment Time: Displays the amount of time spent in each segment of the workout. D Calories: Displays the amount of kcal burned by the user. E Time: Displays the total amount of time used during the workout. Can count up or down.
COMPUTER INSTRUCTIONS PROGRAM DESCRIPTIONS A. Basic Workouts B. Advanced Workouts C.
COMPUTER INSTRUCTIONS PROGRAM DESCRIPTIONS (continued) A. Basic Workouts 1. Hill: Increasing interval resistance levels (hills) that have brief resistance level reductions between increases, followed by a plateau of a steady state resistance level and then a gradual cool-down. 2. Hike: Slow, steady increase in resistance levels to a peak value (based upon level chosen) and then a slow steady decrease in resistance levels to a valley. 3.
COMPUTER INSTRUCTIONS PROGRAM INSTRUCTIONS A. QUICK START 1) Press the "Quick Start" button 2) Enter your weight using the "+" or "-" keys. Or wait five seconds and the computer will default to 150 lbs. 3) Enter your level using the "+" or "-" keys. Or wait five seconds and the computer will default to Level 1. 4) Enter your time using the "+" or "-" keys. Or wait five seconds and the computer will default to 20 minutes. 5) Begin your workout after the starting countdown.
COMPUTER INSTRUCTIONS PROGRAM INSTRUCTIONS (continued) C. ADVANCED WORKOUTS: PUSH-PULL, KICK-IT, TOTAL BODY, BACK & FORTH 1) Press the "Advanced" button and follow the on-screen instructions or read the following printed instructions. 2) Enter your desired Advanced workout profile and press the "Select" button. Note: If you don't press the "Select" button the profile will be automatically selected in three seconds. 3) Enter your weight using the "+" or "-" keys.
STORAGE 1. To store the Avari GX8 simply keep it in a clean dry place. 2. The Avari GX8 is approximately 89 3/8" long x 25 5/8" wide x 64 7/8" tall. These dimensions may vary. Please measure your Avari GX8 if exact dimensions are needed. 3. Move the Avari GX8 with the moving wheels on the REAR STABILIZER(2). Lift from the Front Stabilizer of the MAIN FRAME(1) to move the Avari GX8. Two people are required. 4.
TROUBLESHOOTING With a little care, your Avari GX8 will give you many years of trouble-free use. Our customer service representatives are available to help you with your questions about your machine. Following are some maintenance troubleshooting tips to keep your Avari GX8 in top operating condition. Pedal Lever Bearing Squeaking The Pedal Lever Bearings are located at the end of the RIGHT PEDAL ARM(7) and LEFT PEDAL ARM(6) where they connect to the CRANK DISC(23).
CONDITIONING GUIDELINES How you begin your exercise program depends on your physical condition. If you have been inactive for several years or are severely overweight, start slowly and increase your workout time gradually. Increase your workout intensity gradually, too, by monitoring your heart rate while you exercise. Remember to follow these essentials: Have your doctor review your training and diet programs.
WARM-UP and COOL-DOWN Warm-up The purpose of warming up is to prepare your body for exercise and to minimize injuries. Warm up for two to five minutes before strength-training or aerobic exercising. Perform activities that raise your heart rate and warm the working muscles.
LIMITED WARRANTY MODEL 75-2000 WARRANTY Stamina Products, Inc. warrants that this product will be free from defects in materials and workmanship under normal use, service and proper operation for a period of one year on the parts and five years on the frame from the date of the original purchase from an authorized retailer.
PRODUCT PARTS DRAWING FRONT BACK 28
PARTS LIST DIAGRAM# 1 2 3 4 5 6 7 8 9 10 11 12 13 14 15 16 17 18 19 20 21 22 23 24 25 26 27 28 29 30 31 32 33 34 35 36 37 38 39 40 41 42 43 44 45 46 47 48 49 50 51 52 53 PART NAME Main Frame Rear Stabilizer Upright Rocker Arm Handlebar Left Pedal Arm Right Pedal Arm Shaft Pulley Bearing (6004z) Washer (ø21 x ø30x 1mm thick) C Ring (20mm) V-Ribbed Belt (1428J8) Hybrid Generator Low Control Board Generator Control Wire Generator Power Wire Base Connection Wire Connection Wire Computer Left Cover Right Cover
PARTS LIST DIAGRAM# 54 55 56 57 58 59 60 61 62 63 64 65 66 67 68 69 70 71 72 73 74 75 76 77 78 79 80 81 82 83 84 85 86 87 88 89 90 91 92 93 94 95 96 97 98 99 100 101 102 103 104 105 PART NAME Foam Grip Round Plug (31.8mm) Tray Tray Bottom Cover Oval Endcap Stand Wheel Barrel Nut (M6 x 1.0 threaded, 35mm long) Bolt, Button Head (M6 x 1 x 12mm, with nylock) Bolt, Button Head (M6 x 1 x 16mm, with nylock) Bolt, Button Head (M10 x 1.
FAX/MAIL ORDERING FORM Please do not return the product. For your convenience, Stamina has a Customer Service Department with a toll-free number. Should a part be missing or a defective part found, please call 1 (800) 375-7520 (in the U.S.) from 7:30 A.M. to 5:00 P.M. Central Time, Monday through Thursday and 8:00 A.M. to 3:00 P.M. on Friday or fill out the fax sheet ordering form below and fax it to (417) 889-8064.