
Product Warranty


ASSEMBLY INSTRUCTIONS
9
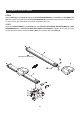
STEP 4
Locate the C Ring(48) on the STOPPER BAR(56). Insert the longer end of the STOPPER BAR(56) through
the MAIN FRAME(1). Secure the STOPPER BAR(56) in position with the SPRING CLIP(46).
STEP 5
There is a “L” decal on the LEFT PEDAL CAP(43L), and a “R” decal on the RIGHT PEDAL CAP(43R).
Insert the PEDAL SHAFT(45) through the holes on the MAIN FRAME(1). Place the LEFT PEDAL
CAP(43L) onto the left end of the PEDAL SHAFT(45) and place the RIGHT PEDAL CAP(43R) onto
the right end of the PEDAL SHAFT(45), and slide them toward the MAIN FRAME(1). Then secure the
PEDAL CAPS (43L, 43R) with WASHERS(M8)(42), LOCK WASHERS(M8)(34), and BUTTON HEAD
BOLTS(M8x1.25x15mm)(57) at both sides of the PEDAL SHAFT(45).
NOTE: You need to use two Allen wrenches to tighten the BUTTON HEAD BOLTS(M8x1.25x15mm)(57)
at both ends of the PEDAL SHAFT(45) at the same time.
L
R