
Product Warranty


ASSEMBLY INSTRUCTIONS
7
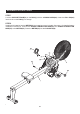
STEP 1: Attach the FRONT STAND(3) to the RAIL(1) with HEX BOLTS(M8x1.25x15mm)(76).
STEP 2: There is a “R” decal on the RIGHT PEDAL CAP(52R), and a “L” decal on the LEFT PEDAL
CAP(52L). Insert the PEDAL SHAFT(97) and SHORT PEDAL SHAFT(98) into the FRONT STAND(3). Slide
the PEDAL SPACERS(88) onto right side of the PEDAL SHAFT(97) and SHORT PEDAL SHAFT(98). Slide
the RIGHT PEDAL CAP(52R) onto right side of the PEDAL SHAFT(97) and SHORT PEDAL SHAFT(98)
and secure with BUTTON HEAD BOLTS(M8x1.25x20mm)(73) and WASHERS(M8xø22x2mm thick)(85).
Push the RIGHT PEDAL CAP(52R) toward the FRONT STAND(3). Slide the PEDAL SPACERS(88) and
LEFT PEDAL CAP(52L) onto left side of the PEDAL SHAFT(97) and SHORT PEDAL SHAFT(98), then
secure with BUTTON HEAD BOLTS(M8x1.25x20mm)(73) and WASHERS(M8xø22x2mm thick)(85).
NOTE: You need to use two wrenches to tighten the BUTTON HEAD BOLTS(M8x1.25x20mm)(73) at both
ends of the PEDAL SHAFT(97) and SHORT PEDAL SHAFT(98) at the same time.
Place all parts from the box in a cleared area and position them on the oor in front of you. Remove
all packing materials from your area and place them back into the box. Do not dispose of the packing
materials until assembly is completed. Read each step carefully before beginning. If you are missing
a part, please go to staminaproducts.com under the Service section and order the part needed,
e-mail us at customerservice@staminaproducts.com, or call us toll free at 1-800-375-7520 (in the
U.S.). Our Customer Service Staff is available to assist you from 7:30 A.M. to 5:00 P.M. (Central
Time) Monday through Thursday and 8:00 A.M. to 3:00 P.M. (Central Time) on Friday.
(
black color
)
(
zincing
)
L
R